
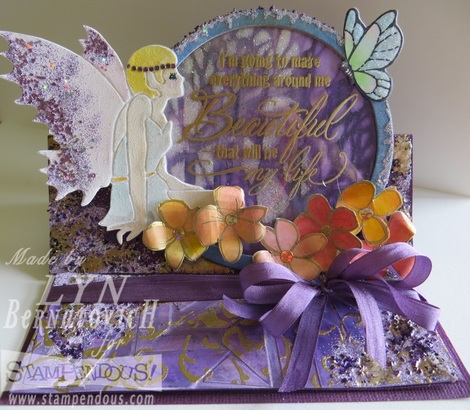
There's something about this Dreamweaver fairy stencil that has me mesmerized (or possessed!) but maybe because I've always had a thing for paper dolls and she's very much like a little paper doll!
Today's project is an easel card:
Today's project is an easel card:
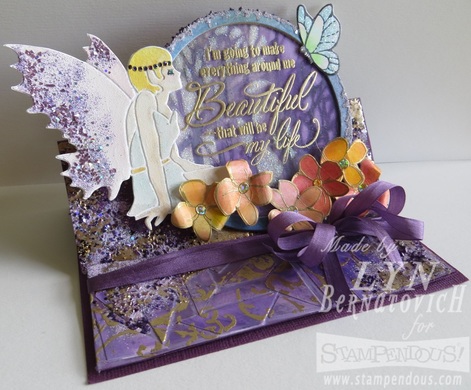
I say 'project' because the 'process' changed directions a few times but I'm very happy with the result! The fairy was stenciled with white paste and allowed to dry. I gesso painted it 'cuz I wanted it primed. Next came the giant circle , which originally was going to be a shaker window but working with diecut frames were problematic for me so I stayed with an acetate window that was heat embossed with Stampendous Detail Gold.
Here's the story about the background in the window. It began as a Gelatoed piece and a Dreamweaver stencil was laid over the panel and color was removed with a baby wipe. For some reason, the finished panel didn't a thing for me as the fairy's background even after I added Stampendous crystal glitter with a Quickie Glue Pen. Plan B in place which is the background of the acetate window! Now I liked it!
Here's a look at the panel before I cut it up:
The upper left area is lighter and that's where I added glitter and focused the diecut circle. The result is okay, but it reminded me of Halloween.
Next step was to create small flowers so here's what I did:
Next step was to create small flowers so here's what I did:

I heat embossed the Stampendous Blossom Bunch flowers with Gold Embossing Powder twice onto pre-prepared gessoed Stampendous Mixed Media paper so I could color the piece with various Gelatoes. Once dry, I fussy cut several of them out and placed Stampendous Gold Dot Sparklers Class A'Peel Stickers at the center of each flower. The butterfly was part of a bunch I had stamped and colored earlier.
All that was left of the top of the easel was to assemble the pieces. The fairy was hot glued onto the acetate window first then the flowers were added and butterfly. Once all that was together, it was hot glued onto the top easel piece.
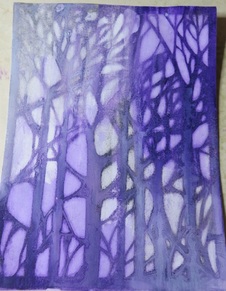
The bottom of the easel needed finishing so I created a mosaic panel from the leftover scrap of purple trees and it looked like this.
All that was left of the top of the easel was to assemble the pieces. The fairy was hot glued onto the acetate window first then the flowers were added and butterfly. Once all that was together, it was hot glued onto the top easel piece.
The bottom of the easel needed finishing so I created a mosaic panel from the leftover scrap of purple trees and it looked like this.
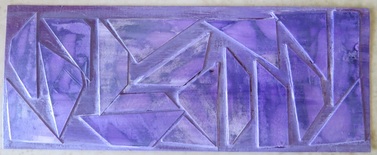
It still needed something so I gold embossed the flourish from the Stampendous Filigree stamp set and that did the trick! To give it more stability, I mounted the piece onto Bazil cardstock that was the same color as the card base. Silk ribbon (May Arts) was tied around the mosaic to fill in the area. 3M foam mounting tape is centered over the entire length of the mosaic piece.
To fill in empty areas and, I had a ball adding Stampendous Encrusted Jewels! That stuff is totally addicting in a seriously good way!
Here's another view from the front. Notice I drew an eye!
To fill in empty areas and, I had a ball adding Stampendous Encrusted Jewels! That stuff is totally addicting in a seriously good way!
Here's another view from the front. Notice I drew an eye!
Next week we are hosting a blog hop with our amazing product partners. The partner hop is a quarterly event where we familiarize you with some of our partner companies, while providing inspiration for how our products work together. It's also an opportunity to win a Sapphire™ machine, Sapphire™ dies AND Partner products! This quarter's 3 day summer event begins on Monday, June 29th and ends on Wednesday, July 1st.
Thank you for stopping by today! I'd love your comment before heading over to the next designer's post.
Stampendous Blog
Jamie Martin
Laura Drahozal
Lyn Bernatovich (that's me!)
Amy Hurley-Purdie
Pam Bray
Kristine Reynolds
Thank you for stopping by today! I'd love your comment before heading over to the next designer's post.
Stampendous Blog
Jamie Martin
Laura Drahozal
Lyn Bernatovich (that's me!)
Amy Hurley-Purdie
Pam Bray
Kristine Reynolds


 RSS Feed