Lyn's Paper Petunia
  • Home
  • CHALLENGES/COLOR INSPIRATION
  • E-NEWS
  • STAMPENDOUS
  • TEMPLATES/TUTORIALS
  • WATERCOLOR
  • About
  • Contact
  • Untitled

Stampendous - Build-A-Snowman - Friday

8/28/2015

6 Comments

 
Okay, you already know what's going on this week at Stampendous featuring the Build-A-Snowman stamp set with a cuteness factor of 10!!!!  LOVE this set and you will too.  

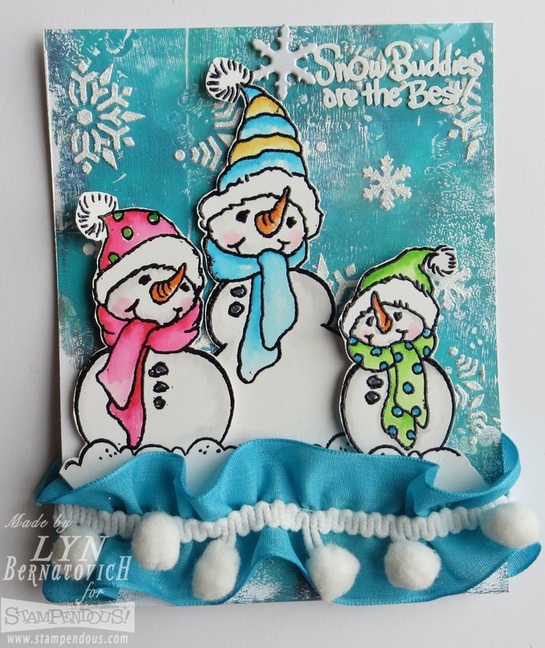
Here's today's easel card with these little cuties.
Picture
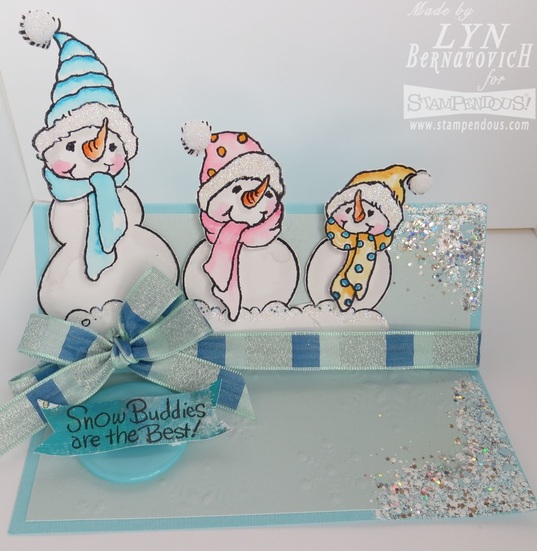
This easel card is so easy because its base is the same as a regular A2 card base.  The only difference is to score at 2-1/8 on the 'card front' and fold toward the inside of the card.  Keep in mind this fold needs a bumper to keep it in place; hence, the Snow Buddies sentiment button!

Look closely at the light blue panel insets and you'll see they are dry embossed with the featured Dreamweaver Snowflakes background stencil.  White Encrusted Embossing Enamel covers the upper right and lower right corners.

The snowmen were stamped with permanent black ink and colored with Zig Clean Color Real Brushes.  Crystal Glitter was added to the hat brims with Glue Pen.  Snowmen were fussy cut out.  The heads were stamped separate from the bodies.  The heads were attached to the bodies with foam mounting tape.  Individual pom poms were dipped in a glue pad and Crystal Glitter was adhered to each hat.  Each snowman was adhered together and Crystal Glitter was added to the top of the snow mounds.  The snowman trio was affixed to the easel with foam mounting tape.  Ribbon was tied around the card and tied in a double bow.

A scrap of colored paper from Thursday's card was used for the sentiment that was stamped with Versafine Onyx Black.  Each end was fishtail cut and the piece was affixed to the button with foam mounting tape.
Stampendous Products
SSC1184       Build a Snowman
MG01           Crystal Micro Glitter
DWLJ819      Snowflakes Stencil
DPW811       Mixed Media White Paper
STF082         Versafine Onyx Black

Other Products:
Bazill Cardstock

Kuretake Zig Clean Color Real Brush
Palette Stamp & Stick Glue Pad

Buttons Galore Button
Archival Black Ink
Claudine Hellmuth Brush
May Arts Ribbon
Beacon 3-1 Adhesive
3M ATG Tape 1/2"

I sure hope you enjoyed my card today and I would love a comment before you hop to the next designer's blog.  Thank you for stopping by!

Stampendous Blog

Lyn Bernatovich

Kristine Reynolds

Wendy Price

Pam Bray

Janelle Stollfus


Disclaimer:  I'm so happy to be a Stampendous Design Team Member and to help promote their wonderful products.  They generously supply us with many free goodies like these Dreamweaver Stencils, Stampendous Perfectly Clear stamp, Mixed Media Paper, Micro Glitter and Versafine inkpad that I'm using today.
6 Comments

Stampendous/Dreamweaver Thursday - Build-A-Snowman

8/27/2015

5 Comments

 
Build A Snowman Perfectly Clear Stamps Set is Stampendous' winter buddies building kit.   Let’s get a jump on winter cards!  Where I live, winter is winter and we have lots of snow to make snowmen pretty much from December through February.  I love making snowman cards and totally love this stamp set!

Here's my whimsical card for today:
Picture
I'll start with the background that was one of the Creative Palette pieces from last week's project.  Here's a photo of the printed panel:
Picture
Just play with the Creative Palette, acrylic paints and brayer and layer it up and stamp the Grunge cling images right into the paint!  You literally never know what you'll get, which is why I love this palette so much.  

Once paper was dry, I cut down the half sheet panel to 5-1/2 x 4-1/4 and pasted the Snowflakes stencil with Glossy White paste.  While still wet, I sprinkled Crystal Glitter over the pasted areas and set it aside to dry.  This was a perfect background for my snowman family!

I stamped the snowmen with VersaMark ink and detail black embossing powder.  I heat embossed the images and fussy cut them out.  The left and right snowmen were mounted onto the center snowman with foam mounting tape and then the little trio was adhered to the card front panel.

Snow Buddies sentiment was stamped with VersaMark ink onto acetate and sprinkled with detail white embossing powder and then heat set.  A snowflake brad held it onto the card front.

The ribbon ruffle and pom pom trim finished the bottom section of the card.  I ran a basting stitch down the center of the ribbon and loosely gathered it and affixed it to the card front.  Pom poms were adhered at the center of the gathered stitching with Beacon Fabri-Tac.
Stampendous Products:
SSC1184       Build a Snowman

CP475           Creative Palette Rectangles
NKCRS03      N*Studio Grunge Cling Rubber Stamps & Stencil
DP100           Detail White Embossing Powder
DP111           Detail Black Embossing Powder

MG01            Crystal Micro Glitter
VM001          VersaMark Ink
DWLJ819      Snowflakes Stencil
DGWP           Glossy White Embossing Paste
DWLM2010  Palette Knife
DWLM2010  Paste Spreader
DPW811       Mixed Media White Paper

Dreamweaver Products:
Jack Richeson Tube Acrylics

Other Products:
Kuretake Zig Clean Color Real Brush

Claudine Hellmuth Brush
May Arts Ribbon and Pom Poms
Hot Off The Press Heat Resistant Acetate
Beacon 3-1 Adhesive
Beacon Fabri-Tac
3M ATG Tape 1/2"
Snowflake Brad (my stash)

EK 1/8" Hole Punch
Milwaukee Heat Tool
I sure hope you enjoyed my card today and I would love a comment before you hop to the next designer's blog.  Thank you for stopping by!

Lyn Bernatovich

Kristine Reynolds

Amy Hurley-Purdie

Louise Healy

Alison Heikkila

Wendy Price

Pam Hornschu

Laura Drahozal


Disclaimer:  I'm so happy to be a Stampendous Design Team Member and to help promote their wonderful products.  They generously supply us with many free goodies like these Dreamweaver Stencils, Embossing Paste, and Mixed Media Paper, Stampendous Perfectly Clear stamp, Versafine inkpad that I'm using today.
5 Comments

Stampendous - Double Day - Friday

8/21/2015

5 Comments

 
Last day of the Stampendous/Dreamweaver team showing off fun projects with Dreamweaver by Stampendous products!

Here's my fun card for today:
Picture
For today's card, I went into my Dreamweaver stash drawer and found this adorable scarecrow already pasted on some cool background paper!  Score!  Even the panel behind the scarecrow was in my stash drawer.  TIP:  I'm telling you, whenever you're making backgrounds, make several in different colors 'cuz it's a great way to have a variety of papers to draw from.  

I wanted my scarecrow to look like burlap, which is simply the cross stitch screen laid over the dry stenciled image.  Color was pounced through the screen with a stencil brush and Splendor ink.  Pretty cool, huh?

Oh, you're wondering how I made the backgrounds?  Well, remember I said I went to my stash drawer?  I'm guessing this scarecrow piece started with Distress inks smooshed on a craft sheet, spritzed with water and mixed media paper was pressed into the puddle.  The paper was lifted and re-pressed into the puddle a few times.  TIP:  Use full sheets of paper at a time to have the option of cutting it up later.

Keep in mind that any coloring medium can be used for this technique.  I'm a huge fan of using sprays such as Memories Mists and, honestly, I believe the card base panel was done this way.  I like giving my paper a little twist when I lay it into the puddles.  TIP:  Have several sheets of paper handy 'cuz you don't want to waste any of that gorgeous color you've created!

If you look closely at the card base panel, you'll see a hint of stamping using the Wired cling set.  I highly recommend that set because of its subtle versatility when creating backgrounds and mixed media work.

Trim the scarecrow panel to 4-1/4 x 3-1/2 and adhere to the card front.  Wrap ribbon around the base of the scarecrow and tie in a double bow.  Double a length of jute and thread through a large button to form an X pattern.  Tie in a bow behind the button and cut the loops to create fringe.  Affix to the ribbon with 3-1 glue.  Stamp sentiment to the lower right corner of the card front.
Stampendous Products:
SSC1115       Birthday Assortment
NKCRS02      N*Studio Wired Cling Rubber Stamps & Stencil
STF082          Versafine Onyx Black Ink
DWLM2010  Palette Knife
DWLM2010  Paste Spreader
DPW811       Mixed Media White Paper

Dreamweaver Products:
LG686  Scarecrow
SC         Cross Stitch Screens
DMOP  Matte Orange Embossing Paste

Stewart Superior Memories Mists (orange juice, wheat grass, pale ale, iced coffee)

Products:
May Arts Ribbon, Jute
Buttons Galore
Beacon 3-1 Adhesive
3M ATG Tape 1/2"

Distress Inks

Thank you for stopping by today and especially for leaving me a comment before hopping to the next designer's blog!

Stampendous Blog

Lyn Bernatovich

Louise Healy

Pam Hornschu

Kristine Reynolds

Jamie Martin


Disclaimer:  I'm so happy to be a Stampendous Design Team Member and to help promote their wonderful products, they generously supply us with many free goodies like these Dreamweaver Stencils, Embossing Paste, Mixed Media Paper, Perfectly Clear stamp, Button and Versafine inkpad that I'm using today.
5 Comments

Stampendous/Dreamweaver Thursday - Double Day

8/20/2015

4 Comments

 
All week the Stampendous/Dreamweaver team are showing off fun projects with Dreamweaver by Stampendous products.

Here's my fun card for today:
Picture
1.  Cut mixed media paper 5-1/4 x 4-1/8.  Stamp the Cling Leaf Plunge image with Versafine onyx black in the lower right area of the card front.  Stamp image a second time on a scrap piece of mixed media paper as you'll be cutting out the pile of leaves once they are colored.  Proceed to color the image with your favorite medium.  Today I used Zig Clean Color Real Brushes.  Fussy cut out the second pile of leaves.
2.  Cut a scrap of mixed media paper and place it on a work surface.  Lay the great pumpkin stencil over the paper and tape down on all four sides.  Paste the pumpkin with matte black paste.  Remove the tape from three sides and gently lift the lower bottom corner of the stencil up and off the paper taking the tape with it.  Set aside to dry.  Once dry.  Prepare the pumpkin to be pasted with the crackle paste in the same manner as the first pasting step.  Once pasted, remove the tape from all three sides again and carefully lift the stencil up and off the paper.  Set the pumpkin aside to dry.  This will take awhile but it is worth the wait!  Once it is perfectly dry, you'll see all those wonderful crackles.  Lay the clean stencil over the pumpkin and add color with stencil brushes and Splendor inkpads (or any pigment inkpad).  Fussy cut out.
3.  I decided I wanted to paste a tree behind my little pumpkin scene and I used another favorite technique, Molten Magic using the tree of life stencil.  It was pasted with metallic copper and sprinkled with bits of FX Mica Powders.  The tree was heated with a heat tool enough so the paste formed bubbles. There is a trick to this technique and moving the heat tool quickly is key to not scorching the paper. Another trick is to immediately lift the heat tool away from the bubbles when they start to form and into another section.
4.  For the background, create a color wash and spread the Zig brush color for the green area and then the sky blue area.  Use lots of water!
5.  Once dry, cut a slit using an X-acto knife along the mouse and leaves long enough to insert the pumpkin.  The pumpkin is held in place with Beacon 3-1 glue.  Ribbon is threaded through the slit and tied in a bow around to the left side of the pumpkin.  The second cut out of leaves are foam taped and placed in front of the pumpkin.
6.  Stamp sentiment on a scrap and trim close.  Staple to upper right corner.  Mount onto card base.

Stampendous Products:
HMCV23      Cling Leaf Plunge
HMCC01      Joy Birthday
DWLL3036  The Great Pumpkin Stencil
DWDMBP    Matte Black Paste
DWDPK        Palette Knife
DWLM2010 Paste Spreader
MPW811     Mixed Media White Paper
STF082        Versafine Onyx Black

DWBHB-3   1/8" Stencil Brush

Products:
Core'dinations Paper
Tsukineko Splendor Inkpad:  Circus, Magic
3M Removable Tape 1/2"
3M Foam Mounting Tape
Beacon 3-1 Adhesive
May Arts Ribbon
Zig Clean Color Real Brush
FX Mica Powders:  07 Plum Royale, 08 Rose Berry, 10 Kiwi


I appreciate you stopping by today and leaving me a comment before hopping to the next designer's blog.

Stampendous Blog

Pam Hornschu

Amy Hurley-Purdie

Lyn Bernatovich

Louise Healy

Kristine Reynolds

Tenia Nelson

Alison Heikkila


Disclaimer:  I'm so happy to be a Stampendous Design Team Member and to help promote their wonderful products, they generously supply us with many free goodies like these Dreamweaver Stencils, Embossing Paste, Mixed Media Paper, Perfectly Clear stamp, Versafine Ony Black Inkpad and May Arts Ribbon that I'm using today.
4 Comments

Stampendous - Mousey Mischief  Friday

8/14/2015

3 Comments

 
My final day of Mousey Mischief card uses the Mice Wishes clear set again!  This card was all about the ice cream cone and what color I'd paint the ice cream.  When the coloring was finished, I decided I had a scoop of pistachio!  Read on to see how I created today's card.
Picture
1.  Cut card base 4-1/4 by 11 and score at 5-1/2.  Set aside.
2.  Heat emboss image onto Mixed Media White paper.  Water color with Prang Watercolors or your favorite water color set.  I prefer using a thin paintbrush over a waterbrush to better control the paint and water.  Once the paint is completely dry, add glitter to the ice cream with a Quickie Glue Pen.  See closeup below.
3.  Cut mixed media white paper 5-1/2 x 4-1/4 and place on a work surface.  Tape the Graduated Dots stencil over the paper on all four sides with removable tape.  Scoop the paste out with a palette knife and spread along the edge of a paste spreader.  Starting at the top of the stencil, pull the paste spreader down to the end of the stencil.  Because we're only going for a narrow border, don't be too concerned with any missed areas, as long as the outer edge is pasted.  Set aside to dry.
4.  Cut a blue panel 5-1/2 x 4-1/4 and dry emboss using a Sizzix Big Kick and the Opto Checkerboard stencil.  Lightly sand the raised areas to reveal a white core.  Diecut the embossed panel with two stitched rectangles to create a frame.  Cut the image to fit the frame and affix the frame to the watercolored image.
5.  TIP:  As an option to foam tape, cut craft foam to equal the size of the framed panel to create a completely smooth surface.  Mount the craft foam to the back of the framed piece with tape runner or liquid adhesive.  Cut the Graduated Dots stenciled panel down to 5-1/4 x 4-1/8 and affix to the card front.  Mount the framed panel to the Graduated Dots stencil.
6.  To create the banner embellishment, cut a scrap pieces as follows:   2-1/8 x 1-1/8, 1-3/4 x 1, 2-1/2 x 1/2.  Snip fish tails out of the first two pieces.  Stamp Make a wish! out of the 2-1/2 x 1/2 piece.  Layer and affix all three banners together.  Wrap ribbon around the top of the banner and tie in a bow.  Affix onto the card front with Beacon 3-1 glue.


Stampendous Products:
SSCM5000 Mice Wishes Perfectly Clear Set
DWLX7029 Graduated Dots Stencil
DWLJ915    Opto Checkerboard Stencil
MPW811    Mixed Media White Paper
DP111        Detail Black Embossing Powder
VM001       VersaMark Inkpad
DWDPK     Palette Knife
DWLM2010 Paste Spreader
MPW811   Mixed Media White Paper
STF082      Versafine Onyx Black Inkpad

Products:
Dreamweaver Glossy White Embossing Paste
Ken Oliver Color Burst Pthalo Green
Prang Watercolor
Claudine Hellmuth Studio Paint Brush #2
May Arts Ribbon
Bazzill Paper
Beacon 3-1 Glue
WennoW 8x12 Craft Foam
3M ATG Tape Runner
Authentique Scraps for Banners

Picture
Closeup of coloring and glittered areas on ice cream cone.

Thank you for stopping by today!  I'd love you to leave me a comment before hopping to the next designer's blog.

Stampendous Blog

Louise Healy

Amy Hurley-Purdie

Kristine Reynolds

Lyn Bernatovich

Lea Kimmel Fritts


Disclaimer:  I'm so happy to be a Stampendous Design Team Member and to help promote their wonderful products, they generously supply us with many free goodies like these Dreamweaver Stencils, Embossing Paste, Mixed Media Paper, Perfectly Clear stamp, Versafine Ony Black Inkpad and May Arts Ribbon that I'm using today.
3 Comments

Stampendous/Dreamweaver Thursday - Mousey Mischief

8/13/2015

4 Comments

 
Welcome to the Stampendous Design Team weekly challenge. This week our theme is Mousey Mischief! You'll see lots of great creations with our wonderful House-Mouse Designs stamps all week long!  These little mice are sure to make you smile. 

 I get the feeling that my lazy little mouse from the Mice Wishes clear set ought to be doing something else, but instead is taking a break from life's hectic pace to enjoy herself!  When I was a little girl, a family member always called me Lynnie Mouse, so this card, ironically, could be a self portrait!
Picture
1.  Cut card base 5-1/2 x 8-1/2 and score at 4-1/4.  
2.  Here's how to create the pink panel using Color Bursts:  Spritz water liberally over the mixed media sheet (8-1/2 x 11) and puff Crimson Color Burst randomly over the water.  With a wide brush, blend the water and powder to create a beautiful background color.  Let it be uneven rather than a perfectly colored panel.  Once dry, cut a piece 5-1/2 x 4-1/4.
3.  To create the background design, dry emboss the pink panel using the Graduated Dot Stencil.  Lay the embossed design on a work surface.  Lay the stencil back over the embossed panel.  With a Jumbo Dauber, ink it liberally into a Palette Glue Pad and press/twist the dauber over the raised areas.  Once glue is applied, remove the stencil and sprinkle          glitter over the panel.  Flick off the excess and return to the jar.  Allow to dry.  Diecut the curved/stitched edge and mount to the card front.
4.  Heat emboss the mouse image with VersaMark and Detail Black embossing powder.  Color with watercolor pencils.  Using a glue pen, glue areas of the water where glitter will be added.  Glue the flower center and add glitter.  Refer to the photo below for closeup details.
5.  Diecut the image using a stitched square diecut.  Create the black dotted frame using two square diecuts.  Add foam mounting tape to the back of the frame and affix to the image.  Diecut a narrower frame out of a scrap piece of Color Burst paper and affix to the dotted frame.
6.  Wrap ribbon around the right side of the card front and tie in a bow.  Affix the mouse framed piece to the card front.
7.  On a scrap piece of cardstock, heat emboss the sentiment using VersaMark ink and Detail Black.  Diecut using the smallest stitched square.  Punch a hole in the left corner and tie onto the ribbon with jute.  Embellish the sentiment tag with Class-A-Peel Pink stickers.
Picture
Close up of the added bits of glitter on the flower center and on the water.  Use a Quickie Glue Pen to add the glitter.
Stampendous Products:
SSCM5000 Mice Wishes Perfectly Clear Set
DWLX7029 Graduated Dots Stencil
MPW811    Mixed Media White Paper
DP111        Detail Black Embossing Powder
VM001       VersaMark Inkpad
AC672HSP Class-A-Peel Pink Dot Sparklers

MGK05       Spring Micro Glitter Kit - Sunflower
MGK05       Winter Micro Glitter Kit - Ice Blue

Products:
A Muse Studio Papers & Landscape Edge Die

My Favorite Things Stitched Diecuts
Faber Castell Aquarelle Pencils:  168, 163, 143, 156, 104, 105, 250, 121,124
Faber Castell Pencils: 73, 99, 76, 87, 17
Claudine Hellmuth Studio #4 Paint Brush
Stewart Superior Palette Stamp & Stick Gluepad
May Arts Ribbon & Jute
Beacon 3-1 Adhesive
3M Foam Mounting Tape

Sakura Quickie Glue Pen
I hope you enjoyed my card today and will leave me a comment before hopping to the next designer's blog.  Thanks for stopping by!

Stampendous Blog

Pam Hornschu

Kristine Reynolds

Lyn Bernatovich

Alison Heikkila

Tenia Nelson

Pam Bray

Louise Healy

Laura Drahozal

Leadonna Quick Fritts


Disclaimer:  I'm so happy to be a Stampendous Design Team Member and to help promote their wonderful products. They generously supply us with many free goodies like these Dreamweaver Stencils and Embossing Powders, Class A Peel Stickers, cling stamps, Faber Castell Aquarell Pencils and May Arts Ribbon that I'm using today.


4 Comments

Stampendous - Create Fall - Final Day

8/7/2015

6 Comments

 
More color inspiration of what fall means to me in my neck of the woods.
Picture
I love going to my Dreamweaver stash drawer looking for colors that will work with a theme!  Today's card is made from leftover backgrounds I created with fall colors in mind.  Here's how I made the backgrounds using Memories Mists:
1.  Using a craft mat, spritz 3 colors of Memories Mists over a good size area.  Spritz Bright Gold in the puddle last.  Swirl (rather than lay) an 8-1/2 x 11 sheet of mixed media paper into the puddle.  Lift up and swirl again.  Keep repeating until you like the result.  Set aside to dry.  Create several sheets for your stash drawer!  Change up the colors for variety.

2.  Hand tear a section of the background to measure roughly 5-1/4 x 4.  Create a collage of stamped textures from the Wired Cling Stamp Set.  Stamp a partial sentiment in the lower right corner.  

3.  Add ribbon by twisting it around the panel.  It is purposely wonky as it rests in the tears of the paper.

4.  To create the leaves, grab a piece of the previously colored background paper and paste the maple leaves with Translucent paste and set aside to dry.  Once dry, fussy cut.  Sprinkle a leaf with Spoonful Rust, heat set to melt from underneath.  Sprinkle elements from the Purple Encrusted Jewel Kit, heat set to melt from underneath.  Mount with foam mounting tape to card front.  Affix to card base.
Stampendous Products:
DWLL3044  Large Maple Leaf
NKCRS02    Cling Wired
CRY025       Cling Life is Art
STF082        Versafine Onyx Black
EJS05           Spoonful Rust
EJK04           Purple Encrusted Jewel Kit

Products:
May Arts Ribbon
Tsukineko Delicata Golden Glitz Ink
Ranger Archival Plum Ink
3M Foam Mounting Tape
3M ATG Tape Runner

Thanks for stopping by today!  I'd love you to leave me a comment before you hop to the next designer's blog.

Stampendous Blog

Pam Bray

Louise Healy

Lyn Bernatovich

Lea Kimmel

Alison Heikkila


Disclaimer:  I'm so happy to be a Stampendous Design Team Member and to help promote their wonderful products. They generously supply us with many free goodies like these Dreamweaver Stencils and Embossing Pastes, cling stamps and May Arts Ribbon that I'm using today.
6 Comments

Stampendous/Dreamweaver Thursday - Create Fall

8/6/2015

6 Comments

 
Where I live here in Upstate New York, we distinctly experience all four seasons, but it is fall that I love the best.  I love the colors changing and watching the trees lose their leaves.  I love crisp sweater weather, fresh picked apples, apple pie (my husband loves my apple crumb crust pie!), pumpkins, corn stalks, homemade soups, and comfort foods.  It's a wonderfully colorful time of year!

My card is inspired by my love of fall.
Picture
1.  Paste The Great Pumpkins with Dreamweaver Matte Orange paste and set aside to dry.  Once dry, lay the clean stencil over the pasted pumpkin and tape along one edge.  The tape acts as a hinge so the stencil can easily lift up and down without shifting during the coloring process.  Distress with Splendor inks and a stencil brush.  Fussy cut out. 

2.  Cut Core’dinations (2 each) cardstock 5-1/2 x 4-1/4.  Dry emboss one cardstock panel using Dreamweaver Basic RGB stencil onto the smooth side of the paper.  Corner round top right corner with a ½” Crop-A-Dile Corner Chomper Tool. 

3.  Dry emboss the second cardstock panel on the textured side using the Dreamweaver Fall Borders stencil.  To create a diagonal pocket effect, cut from the left top corner down to about 1-1/2” from the lower right hand corner.  Edge distress the diagonal and affix to the main panel.

 4.  Affix ribbon along the lower edge approximately 1-1/2” up from the lower edge with double sided tape.  Affix ric rac over the ribbon with double sided tape.

Stampendous Products:
DWLL3036  The Great Pumpkin Stencil
DWLJ915     Opto Checkerboard Stencil
DWLJ874     Fall Borders Stencil
DMOP         Matte Orange Embossing Paste
EJS05           Spoonful Rust
DWDPK       Palette Knife
DWL2010   Paste Spreader
DWGHB-6  1/4" Stencil #6 Brush

Products:
Core'dinations Card Stock
Splendor Inkpad
3M Foam Mounting Tape
May Arts Ribbon, Jute, Ric Rac
Scor-Pal Score-Tape 1/8"
Beacon 3-1 Glue
Distressing Tool
We R Memory Keepers Crop-A-Dial Corner Chomper Tool
Misc. Buttons

Hope you enjoyed my card today!  Thanks for stopping by and I'd love you to leave me a comment before you hop to the next designer's blog.

Stampendous Blog

Louise Healy

Kristine Reynolds

Pam Hornschu

Lyn Bernatovich

Laura Drahozal

Lea Kimmel

Amy Hurley-Purdie

Tenia Nelson

Alison Heikkila


Disclaimer:  I'm so happy to be a Stampendous Design Team Member and to help promote their wonderful products. They generously supply us with many free goodies like these Dreamweaver Stencils and Embossing Pastes, and May Arts Ribbon that I'm using today.
6 Comments
    Picture

    So glad you're here!

    Subscribe to our mailing list

    * indicates required
    Email Format
    Picture
    Click on above card for CHALLENGE SITE LINKS
    Picture
    Picture
    Picture
    Picture
    The Color Throwdown
    Picture
    #TGIF222 - Let's Shake it Up!
    Picture
    Picture
    Picture
    Picture
    Picture
    Picture
    Picture
    Picture
    Picture
    Picture
    Picture
    Picture
    Picture
    Picture
    Picture
    Picture
    Picture
    Let's Have S'More Challenge Winner #81
    Picture
    Muse: Christmas Visions Challenge #109
    Picture
    Muse Challenge #276, #277, #282, #287
    PictureChallenge #85 - Rustic Blooms!

    Picture
    Challenge #70 - Purple Haze Fluid Watercolor Butterfly!
    Picture
    Challenge #69 Rich Texture
    Picture
    Picture
    PictureI am a certified Dreamweaver Instructor

    Archives

    August 2022
    July 2022
    June 2022
    April 2022
    October 2021
    September 2021
    July 2021
    December 2020
    November 2020
    October 2020
    August 2020
    June 2020
    March 2020
    February 2020
    January 2020
    November 2019
    October 2019
    September 2019
    August 2019
    July 2019
    June 2019
    May 2019
    January 2019
    October 2018
    September 2018
    August 2018
    July 2018
    May 2018
    March 2018
    February 2018
    January 2018
    November 2017
    October 2017
    September 2017
    July 2017
    June 2017
    May 2017
    April 2017
    March 2017
    February 2017
    January 2017
    December 2016
    November 2016
    October 2016
    September 2016
    August 2016
    July 2016
    June 2016
    April 2016
    February 2016
    January 2016
    November 2015
    October 2015
    September 2015
    August 2015
    July 2015
    June 2015
    May 2015
    April 2015
    March 2015
    February 2015

    Categories

    All
    #altenew
    #alwaysfunchallenges
    #A Muse Studio
    #andy Skinner
    #CAS
    #CASonFriday162
    #Creatime
    #doodle
    #DreamweaverStencils
    Dreamweaver Stencils
    #DWStencils
    Faber Castell
    Faber-Castell
    #Fall
    #FMS389
    #freshly Made Sketches
    Fun Stampers Journey
    #Geli Arts
    #happylittlestampers
    HSSSC#317
    #inspiredbylaurel
    #Koi Watercolor Paints
    #makethecardschallenge
    #May Arts
    #Mixed Media
    #penny Black
    #seizethebirthday
    #shoppingourstash
    #sketched Cards
    #somethingnew
    #spellbinders
    #Split 4 Stamping
    Stampendous
    #Stampendous
    #stb171
    #the Card Concept
    #THEMAILEROOM
    #timholtz
    #Tombow
    #watercolor
    #Zig Clean Color Real Brush

    RSS Feed

Proudly powered by Weebly