Lyn's Paper Petunia
  • Home
  • CHALLENGES/COLOR INSPIRATION
  • E-NEWS
  • STAMPENDOUS
  • TEMPLATES/TUTORIALS
  • WATERCOLOR
  • About
  • Contact
  • Untitled

Stampendous/Tombow Collaboration - Friday

9/18/2015

25 Comments

 
Picture
Tombow products are my go-to art medium and I'm thrilled we are collaborating with them for the next three days!  They generously sent us their Recycled Colored Pencils and I'm over the moon with the creaminess and beautiful color of this product!

There are yummy prizes involved!  Read all the details on the Stampendous blog HERE.  Leaving a comment on each designer's blog (including the pre-Tombow posts), liking Stampendous and Tombow on Facebook and follow @tombowusa, @stampendous on Instagram and Twitter, gets you into the drawing!  Woo hoo!

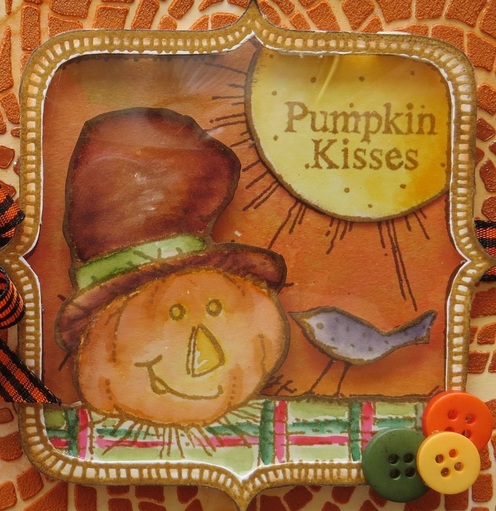
Today's card is an example of color layering on the pumpkins.  Coloring light to dark still applies but I love the dimension that coloring in layers provides.

Picture
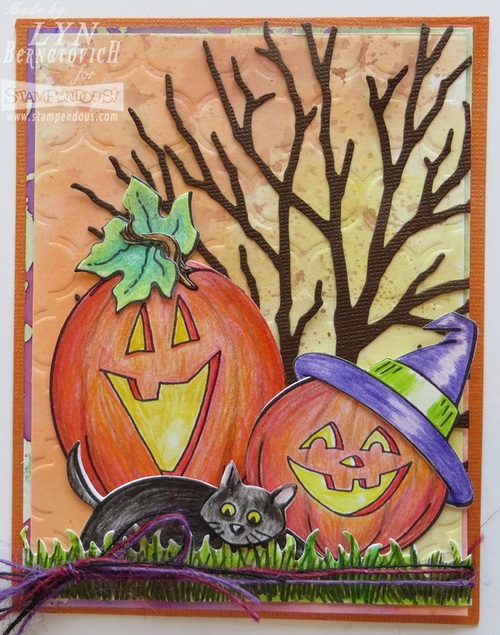
This card was so much fun and even after diecutting the colored images, I continued the fun while putting the final pieces together.  Here's how it came together:

1.  The diecut leafless tree (leftover from an unused project) was resurrected.
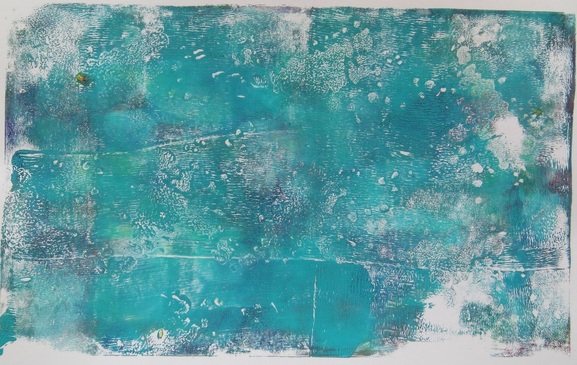
2.  Two background watercolor panels were colored with Tombows scribbled onto palette paper and spritzed with water.  Each panel was pressed into the wet Tombows and set aside to dry.  
3.  The layer right behind the pumpkins was dry embossed using a Dreamweaver Quatrafoil (LX7027) stencil.  The pumpkin panel was adhered to the purple panel.  May Arts jute was tied around the two panels.
4.  Both panels were adhered to the card base with Bazzil cardstock using Tombow Multi Glue.

Stampendous Products:
CRS5078     Cling Create Fall
DCS5078     Create Fall Die Set
MPW811      Mixed Media White Paper
DWDX7020  Leafless Tree Diecut
STF082         Versafine Onyx Black Ink

Products:
LX7027         Dreamweaver Quatrefoil Stencil
Tombow Recycled Pencils
Bazzill Cardstock

Tombow Multi Glue
Tombow Mounting Tape
May Arts Jute
Hope you enjoyed my card today!  I'd love your comment before hopping to the next designer's blog.  Thanks for stopping by!  See you tomorrow!
Stampendous Blog

Kristine Reynolds

Lyn Bernatovich

Jennie Garcia

Jamie Martin

Laura Drahozal

Beth Watson

Amy Hurley-Purdie

Lea Fritts

Tenia Nelson

Tombow Blog


Disclaimer:  I'm so happy to be a Stampendous Design Team Member and to help promote their wonderful products.  They generously supply us with many free goodies like the Dreamweaver Stencil and diecut,  Stampendous stamp set and diecut, May Arts jute and Tombow Pencils I'm using today.

25 Comments

Stampendous - All-In-Ones - Friday

9/4/2015

5 Comments

 
I've had so much fun with All-in-Ones stamps!!!!  They're definitely addicting to work with.  I especially love this Snowman Sweater cling because of its simplicity and it's so easy to cut out and pop up.  In fact, my cutie snowman is mounted on an Action Wobble!  This image differs from Thursday's card in that the bracket frame is in the background and images are in front of the frame.  On Thursday's card, the frame and images were behind the frame!

Here's today's cutie, patootie card:
Picture
There are so many aspects of this card that I'm gaga over and probably the most exciting is the Christmas Borders background that was the first step in making this card.  Once the water coloring was dry, it was cut down to 5-1/4 x 4.  Ribbon was wrapped around the lower portion of the card and then it was adhered to a Bazzill cardstock card base.  

I made a video so you can see how easy and fun water coloring a stencil background is.  P.S.  I'm not a fancy video maker by any means and prefer to just talk and demo all at the same time! 
I stamped the image three times on watercolor paper  'cuz I knew I'd be cutting apart the snowman, sentiment and the frame.  I chose to color with Prang water color paints.  I had color puddles leftover from the stencil painting on my palette paper, so it was easy to color the snowman, sentiment and bracket frame background.

Once all the color was added, I fussy cut all the pieces.  The bracket frame is mounted on craft foam (my new favorite dimensional mounting material).  To add a little more sparkle, I used a Quickie Glue Pen on the frame and sprinkled it with Ice Blue Glittter.   The bracket frame was adhered to the card front.  The sentiment was mounted with foam mounting tape.  The snowman was covered with Quickie Glue Pen and glittered with Crystal Glitter.  A little pom pom was adhered to the snowman's hat.  The snowman was mounted to the bracket frame with an Action Wobble.  For added pizzaz, Encrusted Jewels were heated at the lower portion of the card front.
Stampendous Products:
CRW158  Cling Sweater Snowman
STF082    Versafine Onyx Black
SSH34     Perfectly Clear Handle - Medium
MG01      Crystal Micro Glitter
MGK03    Winter Micro Glitter Kit

EJK03       Encrusted Jewel Blue Kit

Products:
May Arts Ribbon
Prang Water Color Paints
Claudine Hellmuth Brush
Bazzill Cardstock
A Muse Studio Pom Pom
Action Wobble
Scrapbook Adhesive Mounting Squares
3M ATG Tape Runner - 1/2"
Sukura Quickie Glue Pen
Beacon 3-1 Glue

Craft Foam - Craft Store
Thank you for stopping by today and leaving me a comment before hopping to the next designer's blog!

Stampendous Blog

Lyn Bernatovich

Louise Healy

Kristine Reynolds

Pam Bray

Jamie Martin

Amy Hurley-Purdie

Leadonna Fritts


Disclaimer:  I'm so happy to be a Stampendous Design Team Member and to help promote their wonderful products.  They generously supply us with many free goodies like these Dreamweaver Stencils, Stampendous stamp, Mixed Media Paper, Micro Glitter and Versafine inkpad that I'm using today.
5 Comments

Stampendous/Dreamweaver Thursday - All-In-Ones

9/3/2015

8 Comments

 
All-in-Ones are clever stamps designed by Fran Seiford, Stampendous' Owner and Founder.  These stamps have a focal image, a background, a frame, and a phrase for the holidays all in one stamp!  The creative possibilities are limitless.  So now you get what all-in-ones are!

Here's my fun, fall themed card today:
Picture
I adore this Pumpkin Kisses image and it fits right in with my love of fall.  The mosaic swirl background was pasted a few weeks ago with the intention of using it here today.  I really like Dreamweaver's Orange Paste as it's more of a rust color.  I also combined Dreamweaver Metallic Copper Paste in between the orange paste on my paste spreader just to see what would happen when I pulled it down over the stencil.  
Picture
In order to show you the copper and orange paste result, the pumpkin image was full of glare, but it's worth it to see how cool this looks.  I'm sure I can play some more with combining the pastes and getting even more copper highlights.
Picture
Here's a close up of the image that is basically paper pieced after everything was colored, cut out and edged with Vintage Sepia and a finger dauber.  The panel behind the image was a handy dandy piece from my Dreamweaver scrap drawer!  It's so fun to create seasonal backgrounds and then they're ready whenever you need it.  The image was stamped with Versafine Toffee on watercolor paper and stamped a second time with Versafine Vintage Sepia on the background paper.  I used my new favorite Zig Clean Brush markers to color the stamped areas.  Every piece was fussy cut out.  The scarecrow has foam tape behind it and then the acetate frame is glued to the bottom of the scarecrow.  Narrow little strips of foam mounting tape were cut and laid along the remaining edge of the frame.  The bird body was cut out and foam taped onto the background.  Pumpkin Kisses was adhered flat onto the background.

The frame was then ready to mount onto the stenciled background.  Ribbon was wrapped around the stenciled panel and tied in a double bow.  The framed pumpkin was affixed to the stenciled panel with Beacon 3-1 glue.  A piece of Core'dinations was cut 5-1/2 x 4-1/4 and sanded and edge distressed to reveal the orange core and then was mounted to the stenciled panel.  Buttons were affixed with Glue Dots for added interest.
Stampendous Products:
CRW157       Cling Scarecrow Kisses
DPW811       Mixed Media White Paper

Dreamweaver Products:
LJ901           Mosaic Swirls Stencil
DCP             Metallic Copper Embossing Paste
DMOP         Matte Orange Embossing Paste

Other Products:
Core'dinations Cardstock
Kuretake Zig Clean Color Real Brushes
Tsukineko Versafine Inkpads:  Toffee, Vintage Sepia

Tsukineko Finger Dauber
Buttons Galore Buttons
Claudine Hellmuth Paint Brush
May Arts Ribbon
Beacon 3-1 Adhesive
3M ATG Tape 1/2"
Scrapbook Adhesives Foam Mounting Tape
Glue Dots Dot N Go 3/8"
Thank you for stopping by today!  Before you hop to the next designer's blog, I'd love you to leave me a comment.

Stampendous Blog
Lyn Bernatovich
Pam Hornschu
Louise Healy
Kristine Reynolds
Pam Bray
Alison Heikkila
Wendy Price
Laura Drahozal
Lea Fritts


Disclaimer:  I'm so happy to be a Stampendous Design Team Member and to help promote their wonderful products.  They generously supply us with many free goodies like these Dreamweaver Stencils and Embossing Pastes, Stampendous All-in-One stamp, Mixed Media Paper, and Buttons that I'm using today.
8 Comments

Stampendous - Build-A-Snowman - Friday

8/28/2015

6 Comments

 
Okay, you already know what's going on this week at Stampendous featuring the Build-A-Snowman stamp set with a cuteness factor of 10!!!!  LOVE this set and you will too.  

Here's today's easel card with these little cuties.
Picture
This easel card is so easy because its base is the same as a regular A2 card base.  The only difference is to score at 2-1/8 on the 'card front' and fold toward the inside of the card.  Keep in mind this fold needs a bumper to keep it in place; hence, the Snow Buddies sentiment button!

Look closely at the light blue panel insets and you'll see they are dry embossed with the featured Dreamweaver Snowflakes background stencil.  White Encrusted Embossing Enamel covers the upper right and lower right corners.

The snowmen were stamped with permanent black ink and colored with Zig Clean Color Real Brushes.  Crystal Glitter was added to the hat brims with Glue Pen.  Snowmen were fussy cut out.  The heads were stamped separate from the bodies.  The heads were attached to the bodies with foam mounting tape.  Individual pom poms were dipped in a glue pad and Crystal Glitter was adhered to each hat.  Each snowman was adhered together and Crystal Glitter was added to the top of the snow mounds.  The snowman trio was affixed to the easel with foam mounting tape.  Ribbon was tied around the card and tied in a double bow.

A scrap of colored paper from Thursday's card was used for the sentiment that was stamped with Versafine Onyx Black.  Each end was fishtail cut and the piece was affixed to the button with foam mounting tape.
Stampendous Products
SSC1184       Build a Snowman
MG01           Crystal Micro Glitter
DWLJ819      Snowflakes Stencil
DPW811       Mixed Media White Paper
STF082         Versafine Onyx Black

Other Products:
Bazill Cardstock

Kuretake Zig Clean Color Real Brush
Palette Stamp & Stick Glue Pad

Buttons Galore Button
Archival Black Ink
Claudine Hellmuth Brush
May Arts Ribbon
Beacon 3-1 Adhesive
3M ATG Tape 1/2"

I sure hope you enjoyed my card today and I would love a comment before you hop to the next designer's blog.  Thank you for stopping by!

Stampendous Blog

Lyn Bernatovich

Kristine Reynolds

Wendy Price

Pam Bray

Janelle Stollfus


Disclaimer:  I'm so happy to be a Stampendous Design Team Member and to help promote their wonderful products.  They generously supply us with many free goodies like these Dreamweaver Stencils, Stampendous Perfectly Clear stamp, Mixed Media Paper, Micro Glitter and Versafine inkpad that I'm using today.
6 Comments

Stampendous/Dreamweaver Thursday - Build-A-Snowman

8/27/2015

5 Comments

 
Build A Snowman Perfectly Clear Stamps Set is Stampendous' winter buddies building kit.   Let’s get a jump on winter cards!  Where I live, winter is winter and we have lots of snow to make snowmen pretty much from December through February.  I love making snowman cards and totally love this stamp set!

Here's my whimsical card for today:
Picture
I'll start with the background that was one of the Creative Palette pieces from last week's project.  Here's a photo of the printed panel:
Picture
Just play with the Creative Palette, acrylic paints and brayer and layer it up and stamp the Grunge cling images right into the paint!  You literally never know what you'll get, which is why I love this palette so much.  

Once paper was dry, I cut down the half sheet panel to 5-1/2 x 4-1/4 and pasted the Snowflakes stencil with Glossy White paste.  While still wet, I sprinkled Crystal Glitter over the pasted areas and set it aside to dry.  This was a perfect background for my snowman family!

I stamped the snowmen with VersaMark ink and detail black embossing powder.  I heat embossed the images and fussy cut them out.  The left and right snowmen were mounted onto the center snowman with foam mounting tape and then the little trio was adhered to the card front panel.

Snow Buddies sentiment was stamped with VersaMark ink onto acetate and sprinkled with detail white embossing powder and then heat set.  A snowflake brad held it onto the card front.

The ribbon ruffle and pom pom trim finished the bottom section of the card.  I ran a basting stitch down the center of the ribbon and loosely gathered it and affixed it to the card front.  Pom poms were adhered at the center of the gathered stitching with Beacon Fabri-Tac.
Stampendous Products:
SSC1184       Build a Snowman

CP475           Creative Palette Rectangles
NKCRS03      N*Studio Grunge Cling Rubber Stamps & Stencil
DP100           Detail White Embossing Powder
DP111           Detail Black Embossing Powder

MG01            Crystal Micro Glitter
VM001          VersaMark Ink
DWLJ819      Snowflakes Stencil
DGWP           Glossy White Embossing Paste
DWLM2010  Palette Knife
DWLM2010  Paste Spreader
DPW811       Mixed Media White Paper

Dreamweaver Products:
Jack Richeson Tube Acrylics

Other Products:
Kuretake Zig Clean Color Real Brush

Claudine Hellmuth Brush
May Arts Ribbon and Pom Poms
Hot Off The Press Heat Resistant Acetate
Beacon 3-1 Adhesive
Beacon Fabri-Tac
3M ATG Tape 1/2"
Snowflake Brad (my stash)

EK 1/8" Hole Punch
Milwaukee Heat Tool
I sure hope you enjoyed my card today and I would love a comment before you hop to the next designer's blog.  Thank you for stopping by!

Lyn Bernatovich

Kristine Reynolds

Amy Hurley-Purdie

Louise Healy

Alison Heikkila

Wendy Price

Pam Hornschu

Laura Drahozal


Disclaimer:  I'm so happy to be a Stampendous Design Team Member and to help promote their wonderful products.  They generously supply us with many free goodies like these Dreamweaver Stencils, Embossing Paste, and Mixed Media Paper, Stampendous Perfectly Clear stamp, Versafine inkpad that I'm using today.
5 Comments
    Picture

    So glad you're here!

    Subscribe to our mailing list

    * indicates required
    Email Format
    Picture
    Click on above card for CHALLENGE SITE LINKS
    Picture
    Picture
    Picture
    Picture
    The Color Throwdown
    Picture
    #TGIF222 - Let's Shake it Up!
    Picture
    Picture
    Picture
    Picture
    Picture
    Picture
    Picture
    Picture
    Picture
    Picture
    Picture
    Picture
    Picture
    Picture
    Picture
    Picture
    Picture
    Let's Have S'More Challenge Winner #81
    Picture
    Muse: Christmas Visions Challenge #109
    Picture
    Muse Challenge #276, #277, #282, #287
    PictureChallenge #85 - Rustic Blooms!

    Picture
    Challenge #70 - Purple Haze Fluid Watercolor Butterfly!
    Picture
    Challenge #69 Rich Texture
    Picture
    Picture
    PictureI am a certified Dreamweaver Instructor

    Archives

    August 2022
    July 2022
    June 2022
    April 2022
    October 2021
    September 2021
    July 2021
    December 2020
    November 2020
    October 2020
    August 2020
    June 2020
    March 2020
    February 2020
    January 2020
    November 2019
    October 2019
    September 2019
    August 2019
    July 2019
    June 2019
    May 2019
    January 2019
    October 2018
    September 2018
    August 2018
    July 2018
    May 2018
    March 2018
    February 2018
    January 2018
    November 2017
    October 2017
    September 2017
    July 2017
    June 2017
    May 2017
    April 2017
    March 2017
    February 2017
    January 2017
    December 2016
    November 2016
    October 2016
    September 2016
    August 2016
    July 2016
    June 2016
    April 2016
    February 2016
    January 2016
    November 2015
    October 2015
    September 2015
    August 2015
    July 2015
    June 2015
    May 2015
    April 2015
    March 2015
    February 2015

    Categories

    All
    #altenew
    #alwaysfunchallenges
    #A Muse Studio
    #andy Skinner
    #CAS
    #CASonFriday162
    #Creatime
    #doodle
    #DreamweaverStencils
    Dreamweaver Stencils
    #DWStencils
    Faber Castell
    Faber-Castell
    #Fall
    #FMS389
    #freshly Made Sketches
    Fun Stampers Journey
    #Geli Arts
    #happylittlestampers
    HSSSC#317
    #inspiredbylaurel
    #Koi Watercolor Paints
    #makethecardschallenge
    #May Arts
    #Mixed Media
    #penny Black
    #seizethebirthday
    #shoppingourstash
    #sketched Cards
    #somethingnew
    #spellbinders
    #Split 4 Stamping
    Stampendous
    #Stampendous
    #stb171
    #the Card Concept
    #THEMAILEROOM
    #timholtz
    #Tombow
    #watercolor
    #Zig Clean Color Real Brush

    RSS Feed

Proudly powered by Weebly