Lyn's Paper Petunia
  • Home
  • CHALLENGES/COLOR INSPIRATION
  • E-NEWS
  • STAMPENDOUS
  • TEMPLATES/TUTORIALS
  • WATERCOLOR
  • About
  • Contact
  • Untitled

Stampendous Friday - Feeling Distressed

9/25/2015

15 Comments

 
Picture
Welcome to the final day of feeling distressed!  Making a project look old and worn using Stampendous Cling Rubber Stamps designed by DecoArt‘s Executive Creative Consultant, Andy Skinner is all kinds of fun!  My inspiration came from Andy Skinner's 3-part video series on creating rust:  Part 1, Part 2 and Part 3!  See all the prize details on the Stampendous Blog.

Here's Part 2 of Thursday's project:
Picture
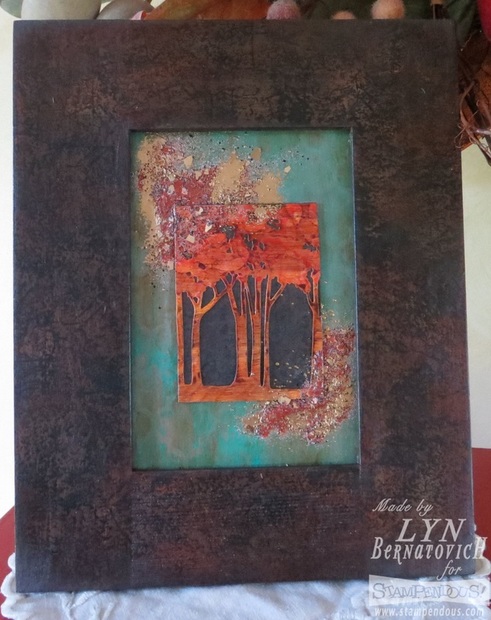
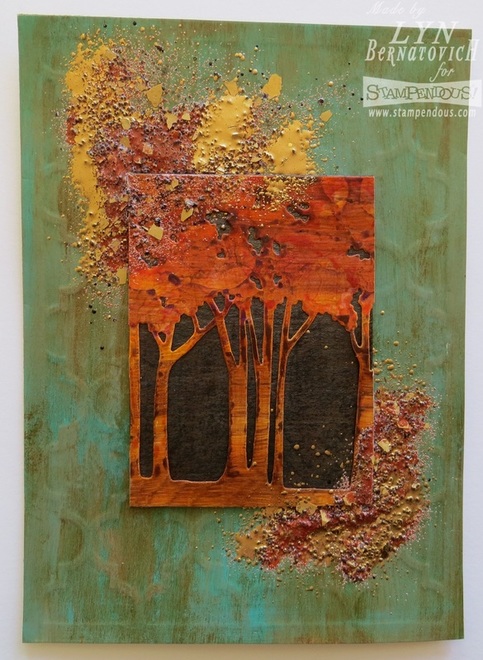
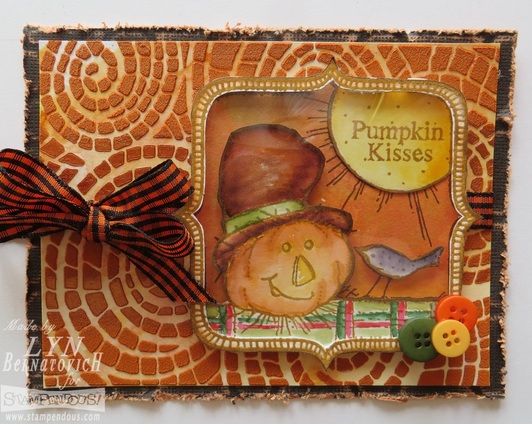
Can you believe this is one of those 'naked' frames from a craft store?  I followed every step of Andy Skinner's Easy Rust Techniques Part 2 video and am seriously happy with the results!  The frame measures 9-1/2 x 7-3/4 inches.  I had to trim down the tree insert just a hair in order for it to fit properly.  Now it's your turn to try creating rust!!!
Picture
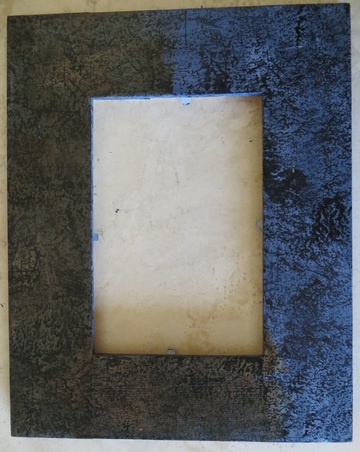
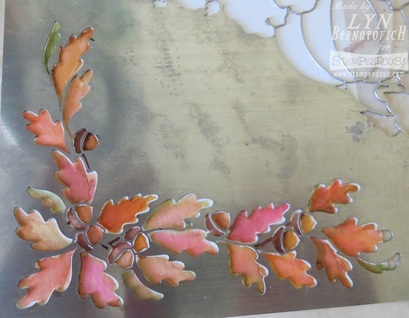
The frame was first prepped by sanding it and then painting it with gesso.  Media Paynes Grey mixed with Media Tinting Base were painted next. This photo shows half of the frame stamped with the Media Carbon Black and the Industrial stamp.   Once that layer was totally dry, the other half shows the added color of the Quinocidone Gold.  Quite the difference, huh?  But, you're getting that rusty feeling, right?

Picture
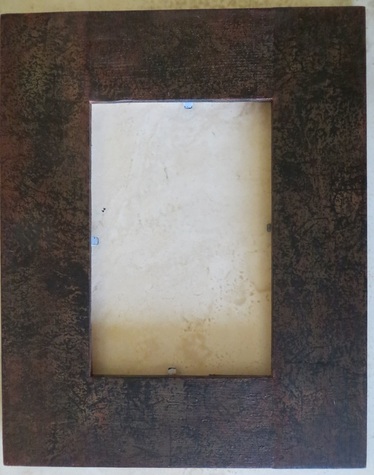
This photo shows the frame after it has been painted with the Media Ultra Matte Varnish, a crucial final step toward the goal of creating rust!

P.S.  My husband is a car guy and we watch 'a lot' of car shows.  A favorite style of mine is the old natural rusty-bucket that is left in its original condition and then clear coated to preserve the rust!  Crazy huh?  But I love it!  My husband is not on board with my 'artistic' preferences.
Stampendous Products:
ASCRS03   Andy Skinner Cling Industrial

Products:
DecoArt Media Fluid Acrylic Quinocidone Gold
DecoArt Media Carbon Black
DecoArt Media Paynes Grey
DecoArt Media Tinting Base
DecoArt Ultra Matte Varnish
Craft Store Frame
Paint Brushes (my stash)

Hope you enjoyed my project today!  I'd love your comment before hopping to the next designer's blog.  Thanks for stopping by!

Stampendous Blog

Lyn Bernatovich

Pam Bray

Kristine Reynolds

Lea Fritts

Amy Hurley-Purdie

Wendy Price

Disclaimer:  I'm so happy to be a Stampendous Design Team Member and to help promote their wonderful products.  They generously supply us with many free goodies like the Andy Skinner stamps and DecoArt acrylics I'm using today.

15 Comments

Stampendous/Dreamweaver Thursday - Feeling Distressed

9/24/2015

14 Comments

 
Picture
Welcome to another day of feeling distressed!  Making a project look old and worn using Stampendous Cling Rubber Stamps designed by DecoArt‘s Executive Creative Consultant, Andy Skinner is going to be all kinds of fun!  My inspiration came from Andy Skinner's 3-part video series on creating rust:  Part 1, Part 2 and Part 3!  See all the prize details on the Stampendous Blog.

Here's my project today:
Picture
Speaking of parts, this is a two-part project, so be sure to stop by on Friday to see the rest of it!  I was inspired by Andy's rust techniques and used two of them today.  I also used his Alcohol and Acrylic Layering technique for the trees.  They almost look like they're cut from wood, don't they?  My result was slightly different than his, but I loved playing with drips of alcohol into a color wash of acrylic paint!  Finally, I used his Shabby Patina Effect that inspired my background.

Since it is Dreamweaver Thursday, you'll see my patina background used the Quatrefoil stencil, but any Dreamweaver stencil would work just fine.  The watercolor paper was dry embossed first and then the shabby patina painted layers were added.

The trees were a portion of the Dreamweaver Tree Line cutting die.  They are mounted on a piece of chipboard that was rusted using Andy's Part 2 technique.  You'll see more of this technique in tomorrow's project.

The trees were affixed to the patina background and Stampendous Spoonful of Rust and Spoonful of Gold were sprinkled on one corner and heated from underneath until it melted.  Then the other corner was completed in the same manner.
Stampendous Products:
ASCRS03   Andy Skinner Cling Industrial
EJS04         Spoonful Gold Dust
EJS05         Spoonful Rust
MPW811   Mixed Media White Paper

Products:
DG745       Dreamweaver Tree Line Cutting Die

Strathmore Bristol (Smooth Surface) Water Color Paper
DecoArt Media Fluid Acrylic Quinocidone Gold, Black
Golden Teal
Jack Richeson's Acrylics:  Yellow Ochre, Burnt Umber, Scarlet, Orange

Beacon 3-1 Glue

Hope you enjoyed my project today!  I'd love your comment before hopping to the next designer's blog.  Thanks for stopping by!

Stampendous Blog

Laura Drahozal

Lyn Bernatovich

Pam Hornschu

Kristine Reynolds

Lea Fritts

Louise Healy

Tenia Nelson

Alison Heikkila

Wendy Price


Disclaimer:  I'm so happy to be a Stampendous Design Team Member and to help promote their wonderful products.  They generously supply us with many free goodies like the Andy Skinner stamps and DecoArt acrylics, Stampendous Spoonful of Gold Dust and Rus and Mixed Media Paper, I'm using today.
14 Comments

Stampendous/Tombow Collaboration - Saturday

9/19/2015

16 Comments

 
Picture
Tombow products are my go-to art medium and I'm thrilled we are collaborating with them!  They generously sent us their Recycled Colored Pencils and I'm over the moon with the creaminess and beautiful color of this product!

For today's card, however, I went back to my favorite Tombow product, Dual Brush Tip Markers because I had an idea stuck in my head for this collaboration and I just had to see it through!

There are yummy prizes involved!  Read all the details on the Stampendous blog HERE.  Leaving a comment on each designer's blog (including the pre-Tombow posts), liking Stampendous and Tombow on Facebook and follow @tombowusa, @stampendous on Instagram and Twitter, gets you into the drawing!  Woo hoo!

Okay, ready for my card?
Picture
I'm so excited about this Tombow colored card because it was born of an idea and one of those "I wonder if" creative moments.  It began by laying the Fall Borders stencil onto watercolor paper and 'painting' through the stencil with a paint brush and Tombow markers scribbled onto palette paper.  The paint brush was wet, but not loaded with water, and color was picked up with the brush from the scribbled marker on the palette paper.  Less water is better than too much for this process as you want to avoid seepage underneath the stencil.  I had a wadded up paper towel handy just in case I saw too much water and blotted away the excess.

Lots of layers of color were added as I painted the border, but basically, I chose one color at a time and painted all the leaves with one color.  Then I went back with a second color over all the leaves until I eventually ended up with a lovely variety of fall foliage colors!  Once the painted leaves were thoroughly dry, I pasted Translucent paste over the stencil to add some visual dimension.  
Picture
This is the stencil laying over the watercolor paper and how it looked while I was painting.
Picture
Here's the result with the stencil removed!  There is virtually no seepage or bleeding!  The next step was to lay the stencil back over the colored image, paste it with translucent paste, and then allow it to dry.  I'm making assumptions you already know how to paste emboss with Dreamweaver Stencils!

Now that I the border was colored and pasted, it was ready for the background using a resist coloring method.  Knowing that I had pretty much one shot at getting the background color right, I played a bit with my Tombow markers separately by pressing panels of watercolor paper into various color combinations.  I decided that the lighter brown tones would work the best.  After scribbling 2-3 Tombow markers onto palette paper, I generously spritzed the scribbles with water and then pressed my watercolor panel into the watery puddles!  Voila!  TIP:  Use a paint brush to spread color around any missed nooks and crannies as in between the leaves.

I allowed the paper to air dry and then pasted the Dreamweaver Autumn word stencil with Metallic Gold paste to complete the card front.  I loved the result!  The finished card front was hand torn on the right side and mounted to the card base.  May Arts ribbon was tied in a bow as a finishing touch.
Picture
One more close-up photo of the dimension on the leaf border and gold metallic shine of the Autumn stencil.
Stampendous Products:
DWLJ874   Fall Borders Stencil
DWDEPT   Translucent Embossing Paste
DWDGP    Metallic Gold Paste
DWDPK     Palette Knife
DWLM2010  Paste Spreader

Products:
LM295 Dreamweaver Autumn Stencil
Tombow Dual Brush Markers:  076, 158, 177, 025, 905, 925, 946, 993912, 947, 977
Bazzill Cardstock

Royal & Langnickel Palette Paper
Strathmore Bristol (Smooth Surface) Water Color Paper
Tombow Multi Glue
May Arts Ribbon
Hope you enjoyed my card today!  I'd love your comment before hopping to the next designer's blog.  Thanks for stopping by!

Stampendous Blog

Pam Bray

Lyn Bernatovich (That's me!)

Jennifer Priest

Janelle Stollfus

Pam Hornschu

Daniella Hayes

Alison Heikkila

Wendy Price

Tombow Blog


Disclaimer:  I'm so happy to be a Stampendous Design Team Member and to help promote their wonderful products.  They generously supply us with many free goodies like the Dreamweaver Stencils, May Arts Ribbon and Tombow Markers I'm using today.
16 Comments

Stampendous/Tombow Collaboration - Friday

9/18/2015

25 Comments

 
Picture
Tombow products are my go-to art medium and I'm thrilled we are collaborating with them for the next three days!  They generously sent us their Recycled Colored Pencils and I'm over the moon with the creaminess and beautiful color of this product!

There are yummy prizes involved!  Read all the details on the Stampendous blog HERE.  Leaving a comment on each designer's blog (including the pre-Tombow posts), liking Stampendous and Tombow on Facebook and follow @tombowusa, @stampendous on Instagram and Twitter, gets you into the drawing!  Woo hoo!

Today's card is an example of color layering on the pumpkins.  Coloring light to dark still applies but I love the dimension that coloring in layers provides.

Picture
This card was so much fun and even after diecutting the colored images, I continued the fun while putting the final pieces together.  Here's how it came together:

1.  The diecut leafless tree (leftover from an unused project) was resurrected.
2.  Two background watercolor panels were colored with Tombows scribbled onto palette paper and spritzed with water.  Each panel was pressed into the wet Tombows and set aside to dry.  
3.  The layer right behind the pumpkins was dry embossed using a Dreamweaver Quatrafoil (LX7027) stencil.  The pumpkin panel was adhered to the purple panel.  May Arts jute was tied around the two panels.
4.  Both panels were adhered to the card base with Bazzil cardstock using Tombow Multi Glue.

Stampendous Products:
CRS5078     Cling Create Fall
DCS5078     Create Fall Die Set
MPW811      Mixed Media White Paper
DWDX7020  Leafless Tree Diecut
STF082         Versafine Onyx Black Ink

Products:
LX7027         Dreamweaver Quatrefoil Stencil
Tombow Recycled Pencils
Bazzill Cardstock

Tombow Multi Glue
Tombow Mounting Tape
May Arts Jute
Hope you enjoyed my card today!  I'd love your comment before hopping to the next designer's blog.  Thanks for stopping by!  See you tomorrow!
Stampendous Blog

Kristine Reynolds

Lyn Bernatovich

Jennie Garcia

Jamie Martin

Laura Drahozal

Beth Watson

Amy Hurley-Purdie

Lea Fritts

Tenia Nelson

Tombow Blog


Disclaimer:  I'm so happy to be a Stampendous Design Team Member and to help promote their wonderful products.  They generously supply us with many free goodies like the Dreamweaver Stencil and diecut,  Stampendous stamp set and diecut, May Arts jute and Tombow Pencils I'm using today.

25 Comments

Stampendous/Dreamweaver - Tombow Fun Thursday

9/17/2015

11 Comments

 
We are really excited for the upcoming hop with Tombow on September 18 – 20th!  There's lots of Tombow mojo so plan on being inspired all week!

I absolutely love my Tombow Dual Brush Markers and use them all the time in many ways.  One of my favorite uses of them is for water coloring.  I simply scribble the brush tip onto palette paper, which becomes my paint palette.  I like using palette paper because it's large size allows me to add several colors and it's white so I get a true visual of each color.  You can use acrylic blocks with a piece of white paper underneath as a good option.

Here's my sweet little card today:
Picture
Since it's Dreamweaver Thursday, I chose a favorite stencil, Pine Trees (DWLL570).  I simply laid the stencil on water color paper and traced each tree with a pencil.  I added a sixth tree to fill in the width of the card.  The next step was to use the 'wet-on-wet' water color technique, which is to wet one tree at a time with a paint brush, then add color from the scribbled marker on the palette paper.  I love watching the color bloom and feather!  I added two other shades of greens while the tree was still wet.  Honestly, there's no right or wrong here and the trees look hand drawn, don't they?

Once my trees were painted, I added color to the tree trunks.  Before proceeding to the snow base, I made sure the paper was dry using my heat tool.  The snow was added with the same wet-on-wet technique.  That area was also dried before moving to the green hills behind the trees.  Finally, the sky was added last.

The sentiment was stamped with cocoa archival ink.  Spoonful of Pixie Dust was lightly sprinkled over the card front.  I used my handy dandy pointy straw which worked great for adding tiny amounts.  The snow was heat set from underneath.

The tree panel was mounted on craft foam and then mounted onto another section of watercolor paper as I wanted to keep it understated.
Stampendous Products:
DWLL570  Pine Trees Stencil
SSC1209   Holiday Words
EJS06         Spoonful of Pixie Dust

Products:
Tombow Dual Brush Markers:  126, 228, 249, N55, 451
Archival Ink - Cocoa
Royal & Langnickel Palette Paper
Strathmore Bristol (Smooth Surface) Water Color Paper
Family Maid Foam Sheets
3M ATG Tape
Small Pointy Tipped Paint Brush (not a waterbrush)
Hope you enjoyed my card today!  I'd love your comment before hopping to the next designer's blog.  Thanks for stopping by!  See you tomorrow!

Stampendous Blog

Laura Drahozal

Lyn Bernatovich

Jamie Martin

Kristine Reynolds

Louise Healy

Pam Bray

Amy Hurley-Purdie

Pam Hornschu

Tenia Nelson

Lea Fritts


Disclaimer:  I'm so happy to be a Stampendous Design Team Member and to help promote their wonderful products.  They generously supply us with many free goodies like the Dreamweaver Stencil,  Stampendous stamp set and Spoonful of Pixie Dust I'm using today.
11 Comments

Stampendous -Tombow Fun Wednesday

9/16/2015

8 Comments

 
Picture
We are really excited for the upcoming hop with Tombow on September 18 – 20th!  There's just so much Tombow mojo, plan on being inspired all week!

Here's my Zero Eraser inspired card today:
Picture
My card technique is totally created with a graphite pencil and an eraser!  That's it!  To see a video of this cool technique, click HERE.  I think it's pretty darn easy to accomplish this card with great results.  Once the bats (DWLL525) were 'erased' using a Tombow Mono Zero eraser, they were tangled with the same graphite pencil!  The Leafless Tree (DWLX7020) was laid over the bats and then 'erased' to reveal the design.  The sentient (Stampendous SSC1227) was stamped with Versafine Onyx Black.  Ribbon (May Arts).  Papers:  Stampendous Mixed Media and Core'dinations.
I hope you can leave me a comment before hopping to the next designer's blog.  Thanks for stopping by today!

Stampendous Blog

Lyn Bernatovich

Louise Healy

Wendy Price

Alison Heikkila


Disclaimer:  I'm so happy to be a Stampendous Design Team Member and to help promote their wonderful products.  They generously supply us with many free goodies like these Dreamweaver Stencils, Stampendous stamps, Mixed Media Paper, Tombow Graphite Pencil and Mono Zero Eraser, and Versafine inkpad that I'm using today.
8 Comments

Stampendous - Create Christmas - Friday

9/11/2015

4 Comments

 
It's the last day to Create Christmas with this fabulous stamp set and today, I combined my design with the Pop-Up Die Set!  I just kept adding and playing and having so much creative fun.
Picture
I wanted a retro 50's kind of feel and chose Simple Stories papers I had on hand for the inside card base.  As in yesterday's card, I also created the tree paper with my Creative Palette and acrylic paints.  I just can't resist a reason to play with paint and the palette!  Don't forget to make extra papers for your stash drawer!

The tree was stamped, diecut and layered onto a second stamped tree that acted as the base.  Dew Drops were adhered randomly on the tree and a Maya Road star pin was attached to the back of the tree with Glue Dots.  The tree trunk was a scrap of A Muse studio paper.  The tree was mounted to the card base with foam mounting tape.  May Arts ribbon was tied behind the tree trunk in a double bow.  
Two little stockings were diecut and mounted to the tabs on either side of the tree.

Season's Greetings was stamped with VersaMark ink and detail gold embossing powder and heat set.  The paper was the piece I used to clean off my brayer!  The sentiment was diecut and mounted to the card.  The cardinal was diecut and colored with Wink of Stella Red and mounted to the sentiment with foam mounting tape.

To fill in the bottom portion of the card, I diecut three presents and mounted them on craft foam for extra depth.  The holly was diecut and adhered to the card and then the presents were layered with Glue dots and adhered to the card.  A solid card stock base was cut and affixed to the striped card panel.
Stampendous Products:
CRS5080      Create Christmas Cling
DCS5080      Create Christmas Die Set

CRS5081      Create a Poinsettia Cling
DCS5081      Create a Poinsettia Die Set
VM0001        VersaMark Inkpad
DP102          Detail Gold Embossing Powder
DWDL3005   Holly Die

DWDG693    Nested Stocking Die Set
AC672HSN   Dot Sparklers Gold
MPW811      Mixed Media White Paper

Other Products:
Bazzill Cardstock

Simple Stories Papers
May Arts Ribbon
Glue Dots Dot N Go
Maya Road Star Pin

Dew Drops
Craft Foam
Wink of Stella Red, Green
3M Foam Mounting Tape
Tombow Multi Glue
Basic Grey
A Muse Studio Papers
Thank you for stopping by today and leaving me a comment before hopping to the next designer's blog!

Stampendous Blog

Louise Healy

Lyn Bernatovich

Kristine Reynolds

Amy Hurley-Purdie

Leadonna Fritts

Disclaimer:  I'm so happy to be a Stampendous Design Team Member and to help promote their wonderful products.  They generously supply us with many free goodies like these Dreamweaver Die, Stampendous stampset and matching die, Mixed Media Paper, Detail Embossing Powder, Glue Dots, and Versafine inkpad that I'm using today.
4 Comments

Stampendous/Dreamweaver Thursday - Create Christmas

9/10/2015

5 Comments

 
Are you having fun with Create Christmas stamp set this week?  We sure are!

One of the loved traditions of Christmas season is finding the perfect evergreen tree and decorate it with treasured ornaments and accessories. Now we can create a grove of fun Christmas trees in assorted styles and decorations with two new products from our July 2015 catalog.

Here's my vintage romantic Create Christmas card today:
Picture
I wanted to create a pink tree, which was the first step in my card design.  Usually, on Dreamweaver Thursdays, I design with the stencil first, but I couldn't be happier with the final results of this card.  I was thinking retro vintage and made the background paper with the Creative Palette, acrylic paints and a re-inker.  As usual, I made a bunch of papers to have on hand later.  I also made light and dark hues of pink papers so they weren't all identical.  The excess papers went in my 'Dreamweaver' stash drawer.

 After heat embossing the tree in Sparkle Puff embossing powder, it was diecut with the matching Create Christmas diecut set.  The sparkly ornaments were made with Glue Dots, a straw with the end cut at an angle, and micro glitters from the Christmas Micro Glitter set.  Push the glitter into the Glue Dot with a piece of the release paper or wax paper.  I actually used a silicone tool that is used with glue guns.  Not sure where to place the Glue Dots?  Here's my trick:  I stamped a second tree and placed sequins in the areas where the glue dots would go with my craft tweezers.  Using sequins, I could re-position them for better visual balance.  Once they were in place, I referred to the sample as I affixed the Glue Dots to my pink tree.  TIP:  Bring the paper tree to the Glue Dot rather than try to push the Glue Dot dispenser onto the tree.  I tried lifting them off with craft tweezers, but because they are really gummy, they lost their shape as they were pulled off the release paper.

Season of Joy stencil is 6-1/4 inches tall and I decided to mask off the sentiment and star area to reduce my card size to 5-1/2 inches tall.  The background was pasted with regular white paste and while wet, was sprinkled with Crystal Micro Glitter from the Christmas Micro Glitter Kit.  Once dry, it was trimmed to 4-1/4 x 5-1/8.  'Tis the Season was heat embossed with Versafine Ink and Detail Gold.  

The finished pink panel was mounted on Mixed Media White cardstock.  I added a Maya Road star pin to the back of the tree with a Glue Dot.  Gold floral wire was tied in a bow under the star.  Two strips of 3M Foam mounting tape was adhered to the tree and affixed to the pink stencil panel.
Stampendous Products:
CRS5080      Cling Create Christmas
DCS5080      Create Christmas Die Set
DWLX7016   Season of Joy Stencil
DWDEP         Regular White Embossing Paste
DWDPK         Palette Knife
DWLM2010  Paste Spreader
MGK02          Christmas Micro Glitter Kit
EP525            Sparkle Puff
VM0001        VersaMark Inkpad
DP102           Detail Gold Embossing Powder
SSC1147       Tis the Season Perfectly Clear Stamps

Other Products:
Glue Dots Dot N Go
Maya Road Star Pin
Gold Floral Wire - Craft Store
Thank you for stopping by today and leaving me a comment before hopping to the next designer's blog!

Stampendous Blog

Louise Healy

Lyn Bernatovich

Laura Drahozal

Kristine Reynolds

Pam Hornschu


Disclaimer:  I'm so happy to be a Stampendous Design Team Member and to help promote their wonderful products.  They generously supply us with many free goodies like these Dreamweaver Stencils, Stampendous stamp, Mixed Media Paper, Micro Glitter, Detail Embossing Powder, Glue Dots, and Versafine inkpad that I'm using today.
5 Comments

Stampendous - All-In-Ones - Friday

9/4/2015

5 Comments

 
I've had so much fun with All-in-Ones stamps!!!!  They're definitely addicting to work with.  I especially love this Snowman Sweater cling because of its simplicity and it's so easy to cut out and pop up.  In fact, my cutie snowman is mounted on an Action Wobble!  This image differs from Thursday's card in that the bracket frame is in the background and images are in front of the frame.  On Thursday's card, the frame and images were behind the frame!

Here's today's cutie, patootie card:
Picture
There are so many aspects of this card that I'm gaga over and probably the most exciting is the Christmas Borders background that was the first step in making this card.  Once the water coloring was dry, it was cut down to 5-1/4 x 4.  Ribbon was wrapped around the lower portion of the card and then it was adhered to a Bazzill cardstock card base.  

I made a video so you can see how easy and fun water coloring a stencil background is.  P.S.  I'm not a fancy video maker by any means and prefer to just talk and demo all at the same time! 
I stamped the image three times on watercolor paper  'cuz I knew I'd be cutting apart the snowman, sentiment and the frame.  I chose to color with Prang water color paints.  I had color puddles leftover from the stencil painting on my palette paper, so it was easy to color the snowman, sentiment and bracket frame background.

Once all the color was added, I fussy cut all the pieces.  The bracket frame is mounted on craft foam (my new favorite dimensional mounting material).  To add a little more sparkle, I used a Quickie Glue Pen on the frame and sprinkled it with Ice Blue Glittter.   The bracket frame was adhered to the card front.  The sentiment was mounted with foam mounting tape.  The snowman was covered with Quickie Glue Pen and glittered with Crystal Glitter.  A little pom pom was adhered to the snowman's hat.  The snowman was mounted to the bracket frame with an Action Wobble.  For added pizzaz, Encrusted Jewels were heated at the lower portion of the card front.
Stampendous Products:
CRW158  Cling Sweater Snowman
STF082    Versafine Onyx Black
SSH34     Perfectly Clear Handle - Medium
MG01      Crystal Micro Glitter
MGK03    Winter Micro Glitter Kit

EJK03       Encrusted Jewel Blue Kit

Products:
May Arts Ribbon
Prang Water Color Paints
Claudine Hellmuth Brush
Bazzill Cardstock
A Muse Studio Pom Pom
Action Wobble
Scrapbook Adhesive Mounting Squares
3M ATG Tape Runner - 1/2"
Sukura Quickie Glue Pen
Beacon 3-1 Glue

Craft Foam - Craft Store
Thank you for stopping by today and leaving me a comment before hopping to the next designer's blog!

Stampendous Blog

Lyn Bernatovich

Louise Healy

Kristine Reynolds

Pam Bray

Jamie Martin

Amy Hurley-Purdie

Leadonna Fritts


Disclaimer:  I'm so happy to be a Stampendous Design Team Member and to help promote their wonderful products.  They generously supply us with many free goodies like these Dreamweaver Stencils, Stampendous stamp, Mixed Media Paper, Micro Glitter and Versafine inkpad that I'm using today.
5 Comments

Stampendous/Dreamweaver Thursday - All-In-Ones

9/3/2015

8 Comments

 
All-in-Ones are clever stamps designed by Fran Seiford, Stampendous' Owner and Founder.  These stamps have a focal image, a background, a frame, and a phrase for the holidays all in one stamp!  The creative possibilities are limitless.  So now you get what all-in-ones are!

Here's my fun, fall themed card today:
Picture
I adore this Pumpkin Kisses image and it fits right in with my love of fall.  The mosaic swirl background was pasted a few weeks ago with the intention of using it here today.  I really like Dreamweaver's Orange Paste as it's more of a rust color.  I also combined Dreamweaver Metallic Copper Paste in between the orange paste on my paste spreader just to see what would happen when I pulled it down over the stencil.  
Picture
In order to show you the copper and orange paste result, the pumpkin image was full of glare, but it's worth it to see how cool this looks.  I'm sure I can play some more with combining the pastes and getting even more copper highlights.
Picture
Here's a close up of the image that is basically paper pieced after everything was colored, cut out and edged with Vintage Sepia and a finger dauber.  The panel behind the image was a handy dandy piece from my Dreamweaver scrap drawer!  It's so fun to create seasonal backgrounds and then they're ready whenever you need it.  The image was stamped with Versafine Toffee on watercolor paper and stamped a second time with Versafine Vintage Sepia on the background paper.  I used my new favorite Zig Clean Brush markers to color the stamped areas.  Every piece was fussy cut out.  The scarecrow has foam tape behind it and then the acetate frame is glued to the bottom of the scarecrow.  Narrow little strips of foam mounting tape were cut and laid along the remaining edge of the frame.  The bird body was cut out and foam taped onto the background.  Pumpkin Kisses was adhered flat onto the background.

The frame was then ready to mount onto the stenciled background.  Ribbon was wrapped around the stenciled panel and tied in a double bow.  The framed pumpkin was affixed to the stenciled panel with Beacon 3-1 glue.  A piece of Core'dinations was cut 5-1/2 x 4-1/4 and sanded and edge distressed to reveal the orange core and then was mounted to the stenciled panel.  Buttons were affixed with Glue Dots for added interest.
Stampendous Products:
CRW157       Cling Scarecrow Kisses
DPW811       Mixed Media White Paper

Dreamweaver Products:
LJ901           Mosaic Swirls Stencil
DCP             Metallic Copper Embossing Paste
DMOP         Matte Orange Embossing Paste

Other Products:
Core'dinations Cardstock
Kuretake Zig Clean Color Real Brushes
Tsukineko Versafine Inkpads:  Toffee, Vintage Sepia

Tsukineko Finger Dauber
Buttons Galore Buttons
Claudine Hellmuth Paint Brush
May Arts Ribbon
Beacon 3-1 Adhesive
3M ATG Tape 1/2"
Scrapbook Adhesives Foam Mounting Tape
Glue Dots Dot N Go 3/8"
Thank you for stopping by today!  Before you hop to the next designer's blog, I'd love you to leave me a comment.

Stampendous Blog
Lyn Bernatovich
Pam Hornschu
Louise Healy
Kristine Reynolds
Pam Bray
Alison Heikkila
Wendy Price
Laura Drahozal
Lea Fritts


Disclaimer:  I'm so happy to be a Stampendous Design Team Member and to help promote their wonderful products.  They generously supply us with many free goodies like these Dreamweaver Stencils and Embossing Pastes, Stampendous All-in-One stamp, Mixed Media Paper, and Buttons that I'm using today.
8 Comments
    Picture

    So glad you're here!

    Subscribe to our mailing list

    * indicates required
    Email Format
    Picture
    Click on above card for CHALLENGE SITE LINKS
    Picture
    Picture
    Picture
    Picture
    The Color Throwdown
    Picture
    #TGIF222 - Let's Shake it Up!
    Picture
    Picture
    Picture
    Picture
    Picture
    Picture
    Picture
    Picture
    Picture
    Picture
    Picture
    Picture
    Picture
    Picture
    Picture
    Picture
    Picture
    Let's Have S'More Challenge Winner #81
    Picture
    Muse: Christmas Visions Challenge #109
    Picture
    Muse Challenge #276, #277, #282, #287
    PictureChallenge #85 - Rustic Blooms!

    Picture
    Challenge #70 - Purple Haze Fluid Watercolor Butterfly!
    Picture
    Challenge #69 Rich Texture
    Picture
    Picture
    PictureI am a certified Dreamweaver Instructor

    Archives

    August 2022
    July 2022
    June 2022
    April 2022
    October 2021
    September 2021
    July 2021
    December 2020
    November 2020
    October 2020
    August 2020
    June 2020
    March 2020
    February 2020
    January 2020
    November 2019
    October 2019
    September 2019
    August 2019
    July 2019
    June 2019
    May 2019
    January 2019
    October 2018
    September 2018
    August 2018
    July 2018
    May 2018
    March 2018
    February 2018
    January 2018
    November 2017
    October 2017
    September 2017
    July 2017
    June 2017
    May 2017
    April 2017
    March 2017
    February 2017
    January 2017
    December 2016
    November 2016
    October 2016
    September 2016
    August 2016
    July 2016
    June 2016
    April 2016
    February 2016
    January 2016
    November 2015
    October 2015
    September 2015
    August 2015
    July 2015
    June 2015
    May 2015
    April 2015
    March 2015
    February 2015

    Categories

    All
    #altenew
    #alwaysfunchallenges
    #A Muse Studio
    #andy Skinner
    #CAS
    #CASonFriday162
    #Creatime
    #doodle
    #DreamweaverStencils
    Dreamweaver Stencils
    #DWStencils
    Faber Castell
    Faber-Castell
    #Fall
    #FMS389
    #freshly Made Sketches
    Fun Stampers Journey
    #Geli Arts
    #happylittlestampers
    HSSSC#317
    #inspiredbylaurel
    #Koi Watercolor Paints
    #makethecardschallenge
    #May Arts
    #Mixed Media
    #penny Black
    #seizethebirthday
    #shoppingourstash
    #sketched Cards
    #somethingnew
    #spellbinders
    #Split 4 Stamping
    Stampendous
    #Stampendous
    #stb171
    #the Card Concept
    #THEMAILEROOM
    #timholtz
    #Tombow
    #watercolor
    #Zig Clean Color Real Brush

    RSS Feed

Proudly powered by Weebly