Lyn's Paper Petunia
  • Home
  • CHALLENGES/COLOR INSPIRATION
  • E-NEWS
  • STAMPENDOUS
  • TEMPLATES/TUTORIALS
  • WATERCOLOR
  • About
  • Contact
  • Untitled

Stampendous/Dreamweaver Thursday - All-In-Ones

9/3/2015

8 Comments

 
All-in-Ones are clever stamps designed by Fran Seiford, Stampendous' Owner and Founder.  These stamps have a focal image, a background, a frame, and a phrase for the holidays all in one stamp!  The creative possibilities are limitless.  So now you get what all-in-ones are!

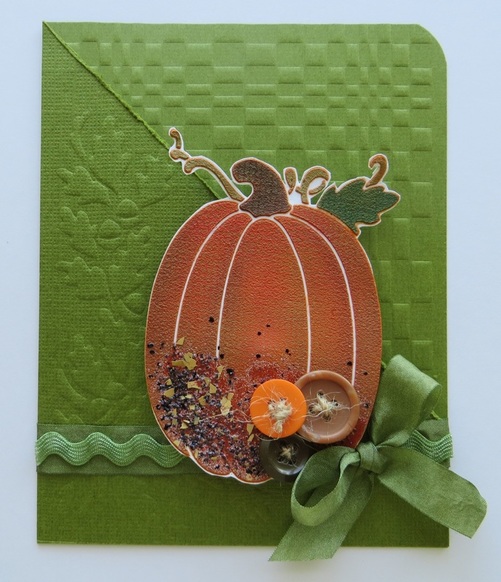
Here's my fun, fall themed card today:
Picture
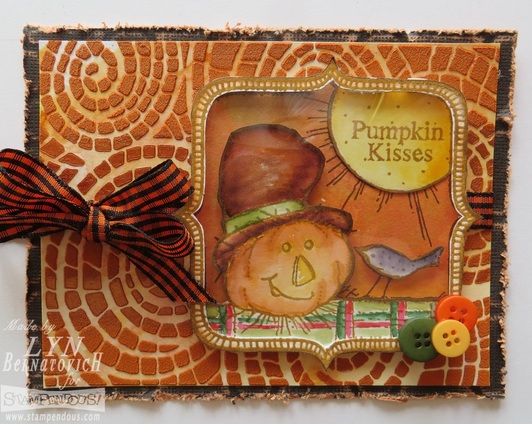
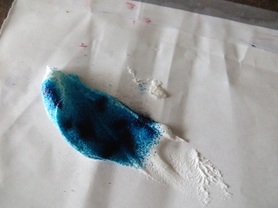
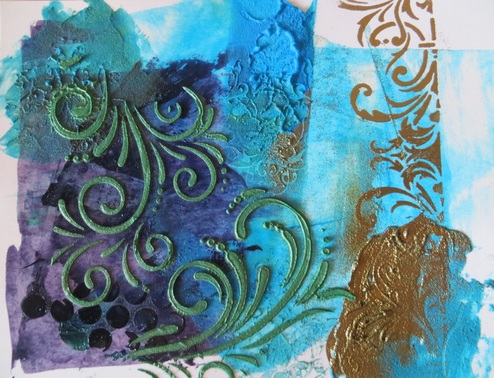
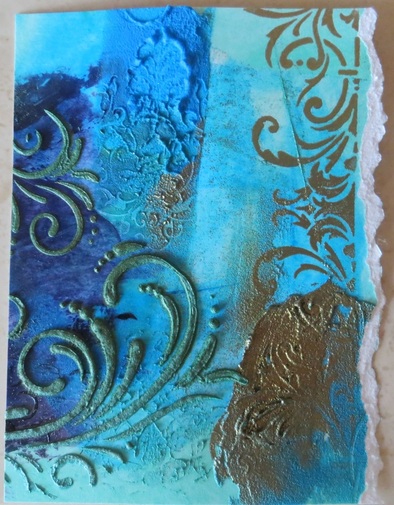
I adore this Pumpkin Kisses image and it fits right in with my love of fall.  The mosaic swirl background was pasted a few weeks ago with the intention of using it here today.  I really like Dreamweaver's Orange Paste as it's more of a rust color.  I also combined Dreamweaver Metallic Copper Paste in between the orange paste on my paste spreader just to see what would happen when I pulled it down over the stencil.  
Picture
In order to show you the copper and orange paste result, the pumpkin image was full of glare, but it's worth it to see how cool this looks.  I'm sure I can play some more with combining the pastes and getting even more copper highlights.
Picture
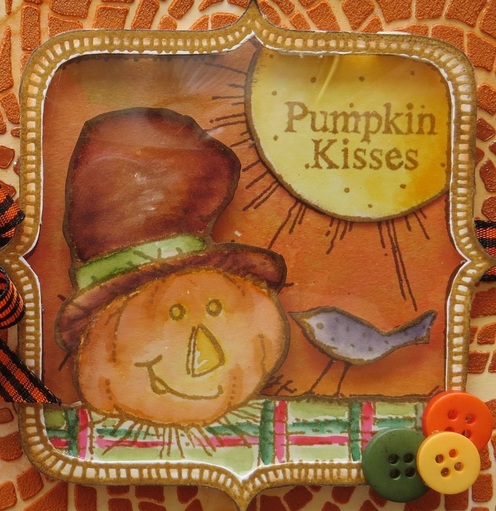
Here's a close up of the image that is basically paper pieced after everything was colored, cut out and edged with Vintage Sepia and a finger dauber.  The panel behind the image was a handy dandy piece from my Dreamweaver scrap drawer!  It's so fun to create seasonal backgrounds and then they're ready whenever you need it.  The image was stamped with Versafine Toffee on watercolor paper and stamped a second time with Versafine Vintage Sepia on the background paper.  I used my new favorite Zig Clean Brush markers to color the stamped areas.  Every piece was fussy cut out.  The scarecrow has foam tape behind it and then the acetate frame is glued to the bottom of the scarecrow.  Narrow little strips of foam mounting tape were cut and laid along the remaining edge of the frame.  The bird body was cut out and foam taped onto the background.  Pumpkin Kisses was adhered flat onto the background.

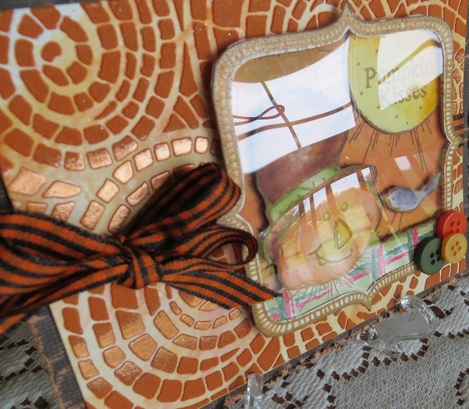
The frame was then ready to mount onto the stenciled background.  Ribbon was wrapped around the stenciled panel and tied in a double bow.  The framed pumpkin was affixed to the stenciled panel with Beacon 3-1 glue.  A piece of Core'dinations was cut 5-1/2 x 4-1/4 and sanded and edge distressed to reveal the orange core and then was mounted to the stenciled panel.  Buttons were affixed with Glue Dots for added interest.
Stampendous Products:
CRW157       Cling Scarecrow Kisses
DPW811       Mixed Media White Paper

Dreamweaver Products:
LJ901           Mosaic Swirls Stencil
DCP             Metallic Copper Embossing Paste
DMOP         Matte Orange Embossing Paste

Other Products:
Core'dinations Cardstock
Kuretake Zig Clean Color Real Brushes
Tsukineko Versafine Inkpads:  Toffee, Vintage Sepia

Tsukineko Finger Dauber
Buttons Galore Buttons
Claudine Hellmuth Paint Brush
May Arts Ribbon
Beacon 3-1 Adhesive
3M ATG Tape 1/2"
Scrapbook Adhesives Foam Mounting Tape
Glue Dots Dot N Go 3/8"
Thank you for stopping by today!  Before you hop to the next designer's blog, I'd love you to leave me a comment.

Stampendous Blog
Lyn Bernatovich
Pam Hornschu
Louise Healy
Kristine Reynolds
Pam Bray
Alison Heikkila
Wendy Price
Laura Drahozal
Lea Fritts


Disclaimer:  I'm so happy to be a Stampendous Design Team Member and to help promote their wonderful products.  They generously supply us with many free goodies like these Dreamweaver Stencils and Embossing Pastes, Stampendous All-in-One stamp, Mixed Media Paper, and Buttons that I'm using today.
8 Comments

Stampendous/Dreamweaver Thursday - Mousey Mischief

8/13/2015

4 Comments

 
Welcome to the Stampendous Design Team weekly challenge. This week our theme is Mousey Mischief! You'll see lots of great creations with our wonderful House-Mouse Designs stamps all week long!  These little mice are sure to make you smile. 

 I get the feeling that my lazy little mouse from the Mice Wishes clear set ought to be doing something else, but instead is taking a break from life's hectic pace to enjoy herself!  When I was a little girl, a family member always called me Lynnie Mouse, so this card, ironically, could be a self portrait!
Picture
1.  Cut card base 5-1/2 x 8-1/2 and score at 4-1/4.  
2.  Here's how to create the pink panel using Color Bursts:  Spritz water liberally over the mixed media sheet (8-1/2 x 11) and puff Crimson Color Burst randomly over the water.  With a wide brush, blend the water and powder to create a beautiful background color.  Let it be uneven rather than a perfectly colored panel.  Once dry, cut a piece 5-1/2 x 4-1/4.
3.  To create the background design, dry emboss the pink panel using the Graduated Dot Stencil.  Lay the embossed design on a work surface.  Lay the stencil back over the embossed panel.  With a Jumbo Dauber, ink it liberally into a Palette Glue Pad and press/twist the dauber over the raised areas.  Once glue is applied, remove the stencil and sprinkle          glitter over the panel.  Flick off the excess and return to the jar.  Allow to dry.  Diecut the curved/stitched edge and mount to the card front.
4.  Heat emboss the mouse image with VersaMark and Detail Black embossing powder.  Color with watercolor pencils.  Using a glue pen, glue areas of the water where glitter will be added.  Glue the flower center and add glitter.  Refer to the photo below for closeup details.
5.  Diecut the image using a stitched square diecut.  Create the black dotted frame using two square diecuts.  Add foam mounting tape to the back of the frame and affix to the image.  Diecut a narrower frame out of a scrap piece of Color Burst paper and affix to the dotted frame.
6.  Wrap ribbon around the right side of the card front and tie in a bow.  Affix the mouse framed piece to the card front.
7.  On a scrap piece of cardstock, heat emboss the sentiment using VersaMark ink and Detail Black.  Diecut using the smallest stitched square.  Punch a hole in the left corner and tie onto the ribbon with jute.  Embellish the sentiment tag with Class-A-Peel Pink stickers.
Picture
Close up of the added bits of glitter on the flower center and on the water.  Use a Quickie Glue Pen to add the glitter.
Stampendous Products:
SSCM5000 Mice Wishes Perfectly Clear Set
DWLX7029 Graduated Dots Stencil
MPW811    Mixed Media White Paper
DP111        Detail Black Embossing Powder
VM001       VersaMark Inkpad
AC672HSP Class-A-Peel Pink Dot Sparklers

MGK05       Spring Micro Glitter Kit - Sunflower
MGK05       Winter Micro Glitter Kit - Ice Blue

Products:
A Muse Studio Papers & Landscape Edge Die

My Favorite Things Stitched Diecuts
Faber Castell Aquarelle Pencils:  168, 163, 143, 156, 104, 105, 250, 121,124
Faber Castell Pencils: 73, 99, 76, 87, 17
Claudine Hellmuth Studio #4 Paint Brush
Stewart Superior Palette Stamp & Stick Gluepad
May Arts Ribbon & Jute
Beacon 3-1 Adhesive
3M Foam Mounting Tape

Sakura Quickie Glue Pen
I hope you enjoyed my card today and will leave me a comment before hopping to the next designer's blog.  Thanks for stopping by!

Stampendous Blog

Pam Hornschu

Kristine Reynolds

Lyn Bernatovich

Alison Heikkila

Tenia Nelson

Pam Bray

Louise Healy

Laura Drahozal

Leadonna Quick Fritts


Disclaimer:  I'm so happy to be a Stampendous Design Team Member and to help promote their wonderful products. They generously supply us with many free goodies like these Dreamweaver Stencils and Embossing Powders, Class A Peel Stickers, cling stamps, Faber Castell Aquarell Pencils and May Arts Ribbon that I'm using today.


4 Comments

Stampendous/Dreamweaver Thursday - Create Fall

8/6/2015

6 Comments

 
Where I live here in Upstate New York, we distinctly experience all four seasons, but it is fall that I love the best.  I love the colors changing and watching the trees lose their leaves.  I love crisp sweater weather, fresh picked apples, apple pie (my husband loves my apple crumb crust pie!), pumpkins, corn stalks, homemade soups, and comfort foods.  It's a wonderfully colorful time of year!

My card is inspired by my love of fall.
Picture
1.  Paste The Great Pumpkins with Dreamweaver Matte Orange paste and set aside to dry.  Once dry, lay the clean stencil over the pasted pumpkin and tape along one edge.  The tape acts as a hinge so the stencil can easily lift up and down without shifting during the coloring process.  Distress with Splendor inks and a stencil brush.  Fussy cut out. 

2.  Cut Core’dinations (2 each) cardstock 5-1/2 x 4-1/4.  Dry emboss one cardstock panel using Dreamweaver Basic RGB stencil onto the smooth side of the paper.  Corner round top right corner with a ½” Crop-A-Dile Corner Chomper Tool. 

3.  Dry emboss the second cardstock panel on the textured side using the Dreamweaver Fall Borders stencil.  To create a diagonal pocket effect, cut from the left top corner down to about 1-1/2” from the lower right hand corner.  Edge distress the diagonal and affix to the main panel.

 4.  Affix ribbon along the lower edge approximately 1-1/2” up from the lower edge with double sided tape.  Affix ric rac over the ribbon with double sided tape.

Stampendous Products:
DWLL3036  The Great Pumpkin Stencil
DWLJ915     Opto Checkerboard Stencil
DWLJ874     Fall Borders Stencil
DMOP         Matte Orange Embossing Paste
EJS05           Spoonful Rust
DWDPK       Palette Knife
DWL2010   Paste Spreader
DWGHB-6  1/4" Stencil #6 Brush

Products:
Core'dinations Card Stock
Splendor Inkpad
3M Foam Mounting Tape
May Arts Ribbon, Jute, Ric Rac
Scor-Pal Score-Tape 1/8"
Beacon 3-1 Glue
Distressing Tool
We R Memory Keepers Crop-A-Dial Corner Chomper Tool
Misc. Buttons

Hope you enjoyed my card today!  Thanks for stopping by and I'd love you to leave me a comment before you hop to the next designer's blog.

Stampendous Blog

Louise Healy

Kristine Reynolds

Pam Hornschu

Lyn Bernatovich

Laura Drahozal

Lea Kimmel

Amy Hurley-Purdie

Tenia Nelson

Alison Heikkila


Disclaimer:  I'm so happy to be a Stampendous Design Team Member and to help promote their wonderful products. They generously supply us with many free goodies like these Dreamweaver Stencils and Embossing Pastes, and May Arts Ribbon that I'm using today.
6 Comments

Stampendous - Playing With Paste - Final Day

7/31/2015

8 Comments

 
I just couldn't leave yesterday's scrap piece without doing something with it, so as I was rummaging through my Dreamweaver drawer, I found a previously letter pressed stencil using the Dreamweaver Corner Flowers Stencil colored with Memories Mists.  I thought the purple matched the mixed media piece quite well and proceeded to create a card!
Picture
 The mixed media piece was only about 2-1/4 x 6 so I added a torn and discarded piece from yesterday's card.  It was literally 1/4" wide but worked well to create an interesting edge.  Refer to yesterday's post for details on the mixed media piece.

Letterpress Technique:  (To create the raised and colored floral panel.)  Place the stencil over a paper towel in your spray box or some contained area.  Spritz Plum Sake 2-3 times.  It doesn't need to be too wet, just well moistened.  Spritz on top with a metallic spray (Iridescent).  Gently pick up the stencil by the sides and place on the diecut platform with the sprayed side facing up.  Lay the mixed media white panel over the stencil.  Lay the rubber mat carefully over the paper.  Carefully lay two cutting plates over that and crank through the diecut machine.

Affix the mixed media scrap over the floral panel and corner round the lower right corner.  Wrap a double strand of May Arts silk ribbon around the piece and double bow.

Stamp the sentiment from Hoppy Moments Cherish Clear Set with Versafine Onyx Black and cut apart to fit the McGill punched tag from a scrap stash.  Add a punched heart from a previously embossed scrap with foam mounting tape.
Stampendous Products:
Corner Flower Stencil
Flourish Stencil
Hoppy Moments Clear Stamp Set
Mixed Media White Paper
Versafine Onyx Black

Products:
Stewart Superior Memories Mist
McGill Heart Punch
May Arts Ribbon
3M ATG Tape Runner
3M Foam Mounting Tape
Thanks for stopping by today!  I'd love you to leave me a comment before you hop to the next designer's blog.

Stampendous Blog

Alison Heikkila

Kristine Reynolds

Pam Bray

Lyn Bernatovich

Lea Kimmel Fritts

Pam Hornschu

Wendy Price

8 Comments

Stampendous/Dreamweaver Thursday - Playing with Paste

7/30/2015

7 Comments

 
Today is all about getting out of the traditional 'paste' box.  My interpretation of  'Playing with Paste' is to use it as a mixed medium to create a card base.  I approached this project as though I were creating a journal page full of texture, color, and stamped images.  I had no pre-planned ideas other than I was using Dreamweaver pastes, Stampendous sentiment and Ken Oliver's Color Bursts.  To my delight, a little puff of Color Burst goes a long way to add beautiful color to paste!  It blends beautifully with a palette knife.  Not only did I use Dreamweaver's Regular White Paste, I also used Glossy Blue Paste for very interesting results!

Here's my finished card:
Picture
The process of how I got to the finished card  follows and I'm hoping you'll see the fun my journey!
Picture
Begin with a small blob of white paste and puff some Color Burst into the paste and mix well with a palette knife. This is a photo using Ultramarine Blue. The photo below used Violet and a little bit of the blue.
Picture
The leaf stencil was pasted first and I knew I'd be fussy cutting it so I wasn't worried about my sloppy pasting! With a palette knife, I scraped paste onto cardstock in various directions. A Stampendous dot stencil was laid over and quickly pasted in one area. The remaining paste was spread randomly. I liked the darker color layer!
Picture
The next layer was a mix of Glossy Blue paste and Ultramarine Blue Color Burst. The leaf stencil (not shown) was pasted first. As in the first layer, I scraped color in random directions and with the remaining paste, swipes of thicker paste were added in a couple of areas. I took a cling damask stamp and pushed it into the paste creating a cool texture. Not shown in the photo, but the remaining white areas were scribbled with a mint green Gelato and blended with a baby wipe.
The final layer added more dimension with the filigree flourishes.  I mixed a tiny blob of Metallic Gold paste with some FX Powder and swiped it in the lower right corner.  The long flourish cling stamp was inked with WaterMark ink and pressed vertically making sure one end was firmly pressed into the gold paste.  Gold embossing powder was sprinkled over the image and heat set.  I also sprinkled some FX into a few other areas that were still wet and heat set it in place.

The greenish colored flourishes were a combination of gold paste, Pthalo Green and Gold FX.  It was a cool green patina result.  The stencil was laid over an area and quicky pasted with a palette knife, again, not worrying about perfectly pasted designs here.  I decided to heat the flourishes with a heat tool and because it was glossy paste, it reacted with the heat giving a puffy dimension.  The piece was set aside to dry.
Picture
The tough part was to decide how to cut down my piece for the card front!  I chose to tear along the vertical flourished edge and cut it down to 5-1/2 x 4-1/4 from there.  You can visualize just where the sentiment needed to be placed, right?  TIP:  Once you have a background, ignore it in order to free your mind to create the foreground.  Sometimes we get visually confused between the two, so just ignore one or the other!  It works, so try it!

Part of the discard piece was used for the sentiment and the rest saved for a future purpose (check back tomorrow)!  The sentiment was inked with VersaMark and gold embossing powder.  It was hand torn on one edge and trimmed to the desired size.  After ribbon was tied on, the sentiment was mounted with foam mounting tape.  One of the leftover leaves was fussy cut and gold metallic thread (my stash) was affixed to the back.  The leaf was mounted with foam mounting tape to the sentiment.
Products Used:
Stampendous:
CRV273   Beautiful Life Cling
CRS5073 Filigree Cling Set
CRV273   Damask Cling
DWLJ896 Large Flourish
DP102     Detail Gold Embossing Powder
VM001    VersaMark Watermark Inkpad

Dreamweaver FX (Mica) Powders:  Glacier Lake, Purple Satin, Ivy Lake
Faber Castell Gelatos:  Black Cherry, Teal, Mint
Ken Oliver's Color Bursts:  Pthalo Green, Alizarin Crimson, Ultramarine Blue
Bazzill Cardstock
Neenah Solar White 110# Cardstock
May Arts Ribbon
Metallic Gold String (my stash)
3M Foam Mounting Tape

Thanks for stopping by today!  I'd love you to leave me a comment before hopping to the next designer's blog.

Stampendous Blog
Alison Heikkila
Louise Healy
Lyn Bernatovich
Pam Hornschu
Kristine Reynolds
Lea Kimmel Fritts
Laura Drahozal
Wendy Price


Disclaimer:  I'm so happy to be a Stampendous Design Team Member and to help promote their wonderful products. They generously supply us with many free goodies like these Stampendous Stamps and Embossing Powders, Dreamweaver Stencils, FX Powders and Embossing Pastes, Bazill Papers, and May Arts Ribbon that I'm using today.
7 Comments

Dreamweaver Stencils - Frilly & Frou Frou

2/26/2015

6 Comments

 
Picture

Break out the frou frou! For the month of February, the Dream Team are going Frilly and Fabulous! Vintage, retro, or modern, adding extra charm with fun Fran•tagé products from Stampendous, ribbons and lace from May Arts, buttons, crystals, charms, or even creating your own dimensional decor! A snippet or a pile, whatever your creative heart desires! Remember to link your creations using the Inlinkz tool on the Dream It Up! blog for a chance to win the stencil of your choice! Bonus points for using Dreamweaver and/or Stampendous product in your work of heart.

Here's what I've been playing with:


I fell in love with the FEATHER stencil (LG760) and had a vision to give it some dimension.  I traced the stencil with a pencil onto watercolor paper and proceeded to paint with acrylic paint adding layers of color and just playing.  It needed some depth so I sketched around it with a charcoal pencil and washed some grey (shadow) acrylic paint around the outside perimeter.  Paint splats and Stampendous Spoonful of Snow & Embossing Powder were added for interest.  Friends was a partial stencil from Fine Feathered Friends (LM2009) using Splendor ink and a 1/8" stencil brush.  White dots were made with a Signo Uniball pen.  Ribbon May Arts, papers Core'dinations, A Muse.  Resin Bird Maya Road painted with acrylic paints, pin my stash.

For more frilly fun, visit the "B" team: 


Dream It Up!
Lyn Bernatovich
Louise Healy
Kristine Reynolds
Pam Hornschu
Gill Wilson
Cindy Groh


An InLinkz Link-up

6 Comments
    Picture

    So glad you're here!

    Subscribe to our mailing list

    * indicates required
    Email Format
    Picture
    Click on above card for CHALLENGE SITE LINKS
    Picture
    Picture
    Picture
    Picture
    The Color Throwdown
    Picture
    #TGIF222 - Let's Shake it Up!
    Picture
    Picture
    Picture
    Picture
    Picture
    Picture
    Picture
    Picture
    Picture
    Picture
    Picture
    Picture
    Picture
    Picture
    Picture
    Picture
    Picture
    Let's Have S'More Challenge Winner #81
    Picture
    Muse: Christmas Visions Challenge #109
    Picture
    Muse Challenge #276, #277, #282, #287
    PictureChallenge #85 - Rustic Blooms!

    Picture
    Challenge #70 - Purple Haze Fluid Watercolor Butterfly!
    Picture
    Challenge #69 Rich Texture
    Picture
    Picture
    PictureI am a certified Dreamweaver Instructor

    Archives

    August 2022
    July 2022
    June 2022
    April 2022
    October 2021
    September 2021
    July 2021
    December 2020
    November 2020
    October 2020
    August 2020
    June 2020
    March 2020
    February 2020
    January 2020
    November 2019
    October 2019
    September 2019
    August 2019
    July 2019
    June 2019
    May 2019
    January 2019
    October 2018
    September 2018
    August 2018
    July 2018
    May 2018
    March 2018
    February 2018
    January 2018
    November 2017
    October 2017
    September 2017
    July 2017
    June 2017
    May 2017
    April 2017
    March 2017
    February 2017
    January 2017
    December 2016
    November 2016
    October 2016
    September 2016
    August 2016
    July 2016
    June 2016
    April 2016
    February 2016
    January 2016
    November 2015
    October 2015
    September 2015
    August 2015
    July 2015
    June 2015
    May 2015
    April 2015
    March 2015
    February 2015

    Categories

    All
    #altenew
    #alwaysfunchallenges
    #A Muse Studio
    #andy Skinner
    #CAS
    #CASonFriday162
    #Creatime
    #doodle
    #DreamweaverStencils
    Dreamweaver Stencils
    #DWStencils
    Faber Castell
    Faber-Castell
    #Fall
    #FMS389
    #freshly Made Sketches
    Fun Stampers Journey
    #Geli Arts
    #happylittlestampers
    HSSSC#317
    #inspiredbylaurel
    #Koi Watercolor Paints
    #makethecardschallenge
    #May Arts
    #Mixed Media
    #penny Black
    #seizethebirthday
    #shoppingourstash
    #sketched Cards
    #somethingnew
    #spellbinders
    #Split 4 Stamping
    Stampendous
    #Stampendous
    #stb171
    #the Card Concept
    #THEMAILEROOM
    #timholtz
    #Tombow
    #watercolor
    #Zig Clean Color Real Brush

    RSS Feed

Proudly powered by Weebly