
Chameleon™ markers bring color control and simplicity to your art, and you can create stunning 3D effects, smooth transitions, highlights, and shading gradations all with one pen.
When you combine this simple coloring versatility with Stampendous® and House-Mouse Designs® images, you can create fantastic projects quickly. Stampendous stamps are beautifully enhanced by the simple blending made possible with this range of innovative markers. The colorless blending tool acts as a “foolproof” finish for your project. You won’t believe the stunning range of colors that can be achieved with these markers, and the array of original projects you can create with the combination of Stampendous and Chameleon.
Prize details!
Stampendous will offer three prize packages to winners in the US, UK or Canada. Be sure to tell us where you live when commenting.
US or UK winners will receive a Cling Create Christmas Stamp Set and Perfectly Clear™Stamp Handle from us or our UK distributor, Woodware Craft Collection.
Winners from Canada will receive a $20 USD Rewards Card to spend on our website.
Deadline to comment is Sunday, July 19th, 11:59 pm PDT. Chameleon will be offering a fantastic prize as well, so be sure to visit their blog for more details.
There is more! Our Australian Distributor, The Stencil Specialists, are sponsoring a prize for one friend “down under” to win a Stampendous Stamp, a Dreamweaver Stencil and a surprise goodie from their terrific stock of Stampendous merchandise! Tell us where you live when you comment to be in the drawing!
Okay, ready for my project today?
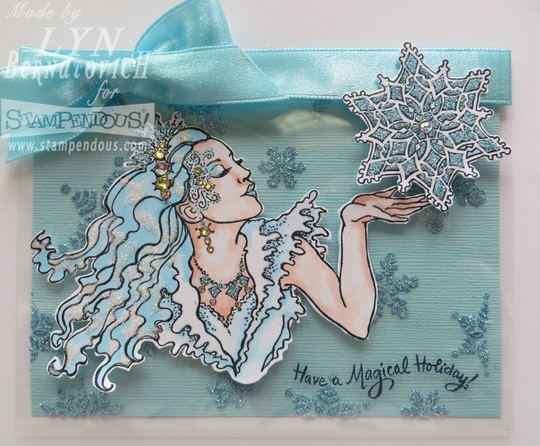
I loved this Stampendous Cling Snow Queen at first sight. She was colored with Chameleon BL3, and NU1. That's right just 2 pens were used to get all this shading! After the Snow Queen and snowflake were colored, I fussy cut them out and then added Stampendous Crystal Glitter and Stampendous Blue ultra fine glitter with a Sakura Quickie Glue Pen. Stampendous Class a'peel stickers (silver) were added for additional bling.
Cut an acrylic sheet (my stash) 5-1/2 x 8-1/2. Score at 4-1/4. Mount the Snow Queen onto the acrylic. I used Beacon 3-1 Glue. Affix 3M Foam Mounting Tape to the back of the snowflake and position above her hand. Ink the sentiment from the Stampendous Holiday Expressions Perfectly Clear Set with Archival Black ink and carefully stamp onto the acrylic panel.
Cut a piece of Bazzill light blue cardstock 11 x 4-1/4 and score at 5-1/2. Tape the snowflake stencil over the cardstock on all 4 sides. Scoop Dreamweaver Translucent Paste using a Palette Knife and spread onto the edge of a Paste Spreader. Starting at the top of the stencil, pull the paste down over the entire stencil. Remove tape from 3 sides leaving the top edge taped. Gently lift up the lower corner of the stencil and pull off of the cardstock taking the tape with it. While the paste is still wet, sprinkle with Stampendous Blue Ultra Fine Glitter and set aside to dry.
Once dry, cut the folded panel down by following the edge of the stencil design. It should now measure 5-1/4 x 4. Lay a 1/4" strip of Scor-Pal Scor-Tape along the top edge of the blue panel. Peel away the top release tape and lay the acrylic panel over the blue panel and center it. Open the card and tie a 1/2" satin ribbon around both cardstock and acrylic to hide the taped edge.
I hope you enjoyed my card today! Before you go to the next designer's blog, I love you to leave me a comment.
Stampendous Blog
Lea Kimmel
Lyn Bernatovich
Kristine Reynolds
Tenia Nelson
Pam Hornschu
Alison Heikkila
Louise Healy
Laura Drahozal
Jamie Martin
Chameleon Pens Blog
Disclaimer: I'm so happy to be a Stampendous Design Team Member and to help promote their wonderful products. They generously supply us with many free goodies like these Chameleon Pens, Stampendous Stamps, Glitters, Stickers, Dreamweaver Stencils, Bazill Papers, and May Arts Ribbon that I'm using today.


 RSS Feed