
It’s summer time and we are hopping with some fabulous companies in the Summer Road Trip Partner Hop with Spellbinders.
Stampendous Stamps is hopping all three days with some fabulous summer inspiration from the design team and on Wednesday two of our designers will be featured a tutorial with some new Spellbinders products! How fun is that!
Prizes! Spellbinders is having a great giveaway during this hop with three daily winners and one grand prize winner! Check out the details here.
For my project today, I was sent two sets of Spellbinders Shapeabilities holiday dies and boy did I have fun playing! Since I wasn't familiar with this product, I found a great instructional video on YouTube. I also found in my Dreamweaver stash drawer, a stenciled toilet paper roll that was begging to be used for today's project!
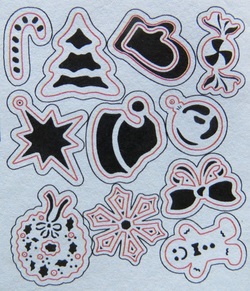
There are 12 dies in the Spellbinder Shapeabilities Die D-Lite Christmas Set-2 (SKU: PHS-511) that I chose to work with. Here's a photo of all the darling little dies! I diecut all of them just to see what they looked like cut and embossed and then narrowed down what I wanted to use in my projects this week.http://www.joann.com
Here's a quick rundown about working with these dies. There's also a useful video on YouTube by Kazan Clark of the Spellbinders Imagination Team that helped me tremendously.
There are 3 steps to creating a finished Shapeabilities diecut shape. My directions use the Spellbinders Grand Caliber machine.1. Diecutting: Lay the die near the edge of A Plate with the cutting side face up. Lay a piece of wax paper over the die (very important step!). Lay your cardstock over the wax paper. Place Cutting Plate C over the paper and diecut. 2. Emboss: Remove Cutting Plate C. Remove the negative portion of the diecut paper and leave the rest in place inside the die. Place the rubber mat over the die. Place the Plate B over the rubber mat and crank through the machine.3. Stencil: Remove the Plate B and rubber mat. Pop out the embossed diecut piece and remove the wax paper. Return the diecut piece to the diecut. Flip it over and lay it on the work surface. You will see the raised (embossed) areas only through the 'stencil.' Now you'll decide how you're going to decorate the raised areas.
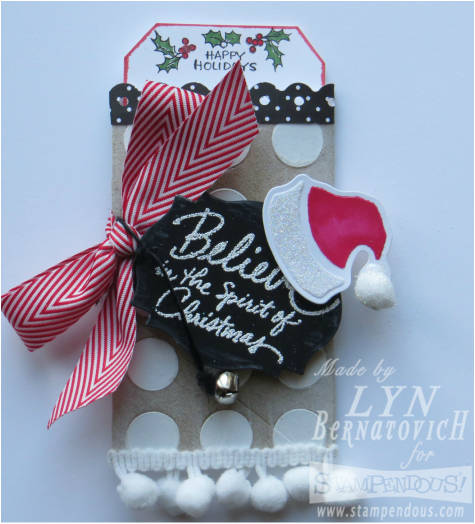
The Santa hat worked perfectly with the Stampendous Believe sentiment. It was heat embossed with Stampendous Sparkle embossing powder onto chalkboard cardstock (Canvas Corp) then diecut with a Spellbinders die. A 1/8" hole was hole punched and jute/hemp (May Arts) was threaded and tied onto the chevron ribbon (May Arts). Little jingle bells (A Muse) were added for additional whimsy.TIP: To flatten a toilet paper roll, run it through a die cut machine between two cutting plates! Works like a charm. I paste embossed the roll with Dreamweaver Glossy white paste and a Dreamweaver Big Dots stencil and set it aside to dry. I added Gelato white (Faber Castell) to the edges and blended the color with my finger. One end of the roll is sealed with double sided tape (Red Line). White pom poms (May Arts) were added with Score-Tape. For the scalloped border around the top of the toilet paper holder I cut a strip 1/2" x 5" from cardstock (A Muse) and border punched it with a Fiskars punch. It was affixed with Scor-Tape (Scor-Pal).Santa's hat was colored with Copic R29 Crimson. The brim was covered with Quickie Glue Pen and Stampendous Crystal Glitter was sprinkled. Pom pom (A Muse) was rolled in a Palette Stamp & Stick Glue Pad (Stewart Superior), picked up with tweezers and 'dunked' into Stampendous Crystal Glitter and allowed to dry before affixing onto the hat with Beacon Fabri-Tac. It was mounted with a foam square (Scrapbook Adhesives) onto the tag. The tag was threaded with black hemp (May Arts) and tied around the red/white chevron ribbon bow (May Arts). Two small jingle bells (A Muse) were tied at the ends.
There are 3 steps to creating a finished Shapeabilities diecut shape. My directions use the Spellbinders Grand Caliber machine.1. Diecutting: Lay the die near the edge of A Plate with the cutting side face up. Lay a piece of wax paper over the die (very important step!). Lay your cardstock over the wax paper. Place Cutting Plate C over the paper and diecut. 2. Emboss: Remove Cutting Plate C. Remove the negative portion of the diecut paper and leave the rest in place inside the die. Place the rubber mat over the die. Place the Plate B over the rubber mat and crank through the machine.3. Stencil: Remove the Plate B and rubber mat. Pop out the embossed diecut piece and remove the wax paper. Return the diecut piece to the diecut. Flip it over and lay it on the work surface. You will see the raised (embossed) areas only through the 'stencil.' Now you'll decide how you're going to decorate the raised areas.
The Santa hat worked perfectly with the Stampendous Believe sentiment. It was heat embossed with Stampendous Sparkle embossing powder onto chalkboard cardstock (Canvas Corp) then diecut with a Spellbinders die. A 1/8" hole was hole punched and jute/hemp (May Arts) was threaded and tied onto the chevron ribbon (May Arts). Little jingle bells (A Muse) were added for additional whimsy.TIP: To flatten a toilet paper roll, run it through a die cut machine between two cutting plates! Works like a charm. I paste embossed the roll with Dreamweaver Glossy white paste and a Dreamweaver Big Dots stencil and set it aside to dry. I added Gelato white (Faber Castell) to the edges and blended the color with my finger. One end of the roll is sealed with double sided tape (Red Line). White pom poms (May Arts) were added with Score-Tape. For the scalloped border around the top of the toilet paper holder I cut a strip 1/2" x 5" from cardstock (A Muse) and border punched it with a Fiskars punch. It was affixed with Scor-Tape (Scor-Pal).Santa's hat was colored with Copic R29 Crimson. The brim was covered with Quickie Glue Pen and Stampendous Crystal Glitter was sprinkled. Pom pom (A Muse) was rolled in a Palette Stamp & Stick Glue Pad (Stewart Superior), picked up with tweezers and 'dunked' into Stampendous Crystal Glitter and allowed to dry before affixing onto the hat with Beacon Fabri-Tac. It was mounted with a foam square (Scrapbook Adhesives) onto the tag. The tag was threaded with black hemp (May Arts) and tied around the red/white chevron ribbon bow (May Arts). Two small jingle bells (A Muse) were tied at the ends.
Toilet paper holders are a perfect size to hold gift cards! Here's my simple pocket tag that is folded up to create the pocket and a paper 'band' is wrapped around to create the pocket! Two sweet Stampendous Christmas Visions and Christmas Wishes (sneak peeks!) were used to embellish the tag. Copic Crimson and Willow G24 were used to color the holly.
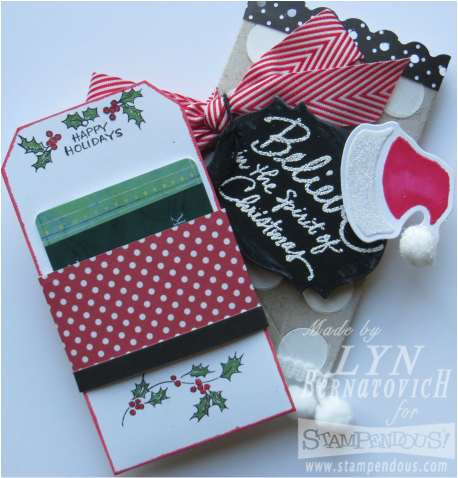
Tag Construction: Cut white cardstock (Neenah Solar White 90#) 2-7/8" x 7." Score at 4-1/2" and fold to create the pocket. Cut a strip of pattern paper (Simple Stories) 1-1/2" x 5" and wrap it around the top edge of the pocket. Affix one end of strip directly onto the tag and the other end of the strip affixes over the strip. I used 3M Scotch ATG 1/4" tape. I also cut a black 1/4" x 5" strip (A Muse) and affixed that at the bottom of the dotted panel.The tag sentiment (Stampendous Christmas Visions Perfectly Clear Set) and holly (Stampendous Christmas Wishes Perfectly Clear Set) are sneaks from the upcoming July Catalog . Leaves were colored with Copic Willow G24 and berries were colored with Wink of Stella GL Red 020 (Zig). The tag was also edged with Wink of Stella GL Red 020.Hope you enjoyed my project today! Before you go to the next designer's blog (just click on the Stampendous Blog link), I'd love you to leave me a comment. Thanks for stopping by!
Stampendous Blog
Louise Healy
Jamie Martin
Lyn Bernatovich (that's me!)
Kristine Reynolds
Stampendous Blog
Louise Healy
Jamie Martin
Lyn Bernatovich (that's me!)
Kristine Reynolds


 RSS Feed