Lyn's Paper Petunia
  • Home
  • CHALLENGES/COLOR INSPIRATION
  • E-NEWS
  • STAMPENDOUS
  • TEMPLATES/TUTORIALS
  • WATERCOLOR
  • About
  • Contact
  • Untitled

Giant Pillow Box

11/12/2020

0 Comments

 
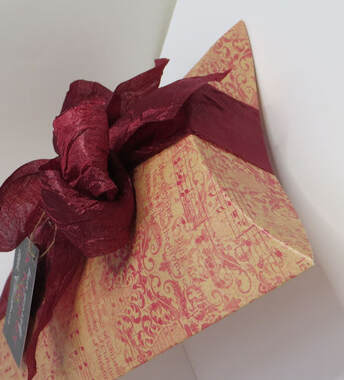
Here's a stylishly easy 7" x 5-3/4" giant pillow box that is perfect for holiday DIY packaging!  I made this many years ago and thought it was worth sharing again.  There's no end to how it's decorated. 

Picture
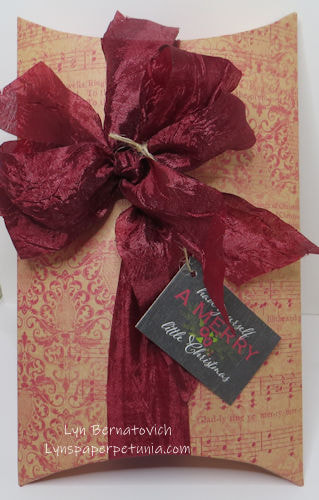
The pillow flaps are a simple score and folded over.
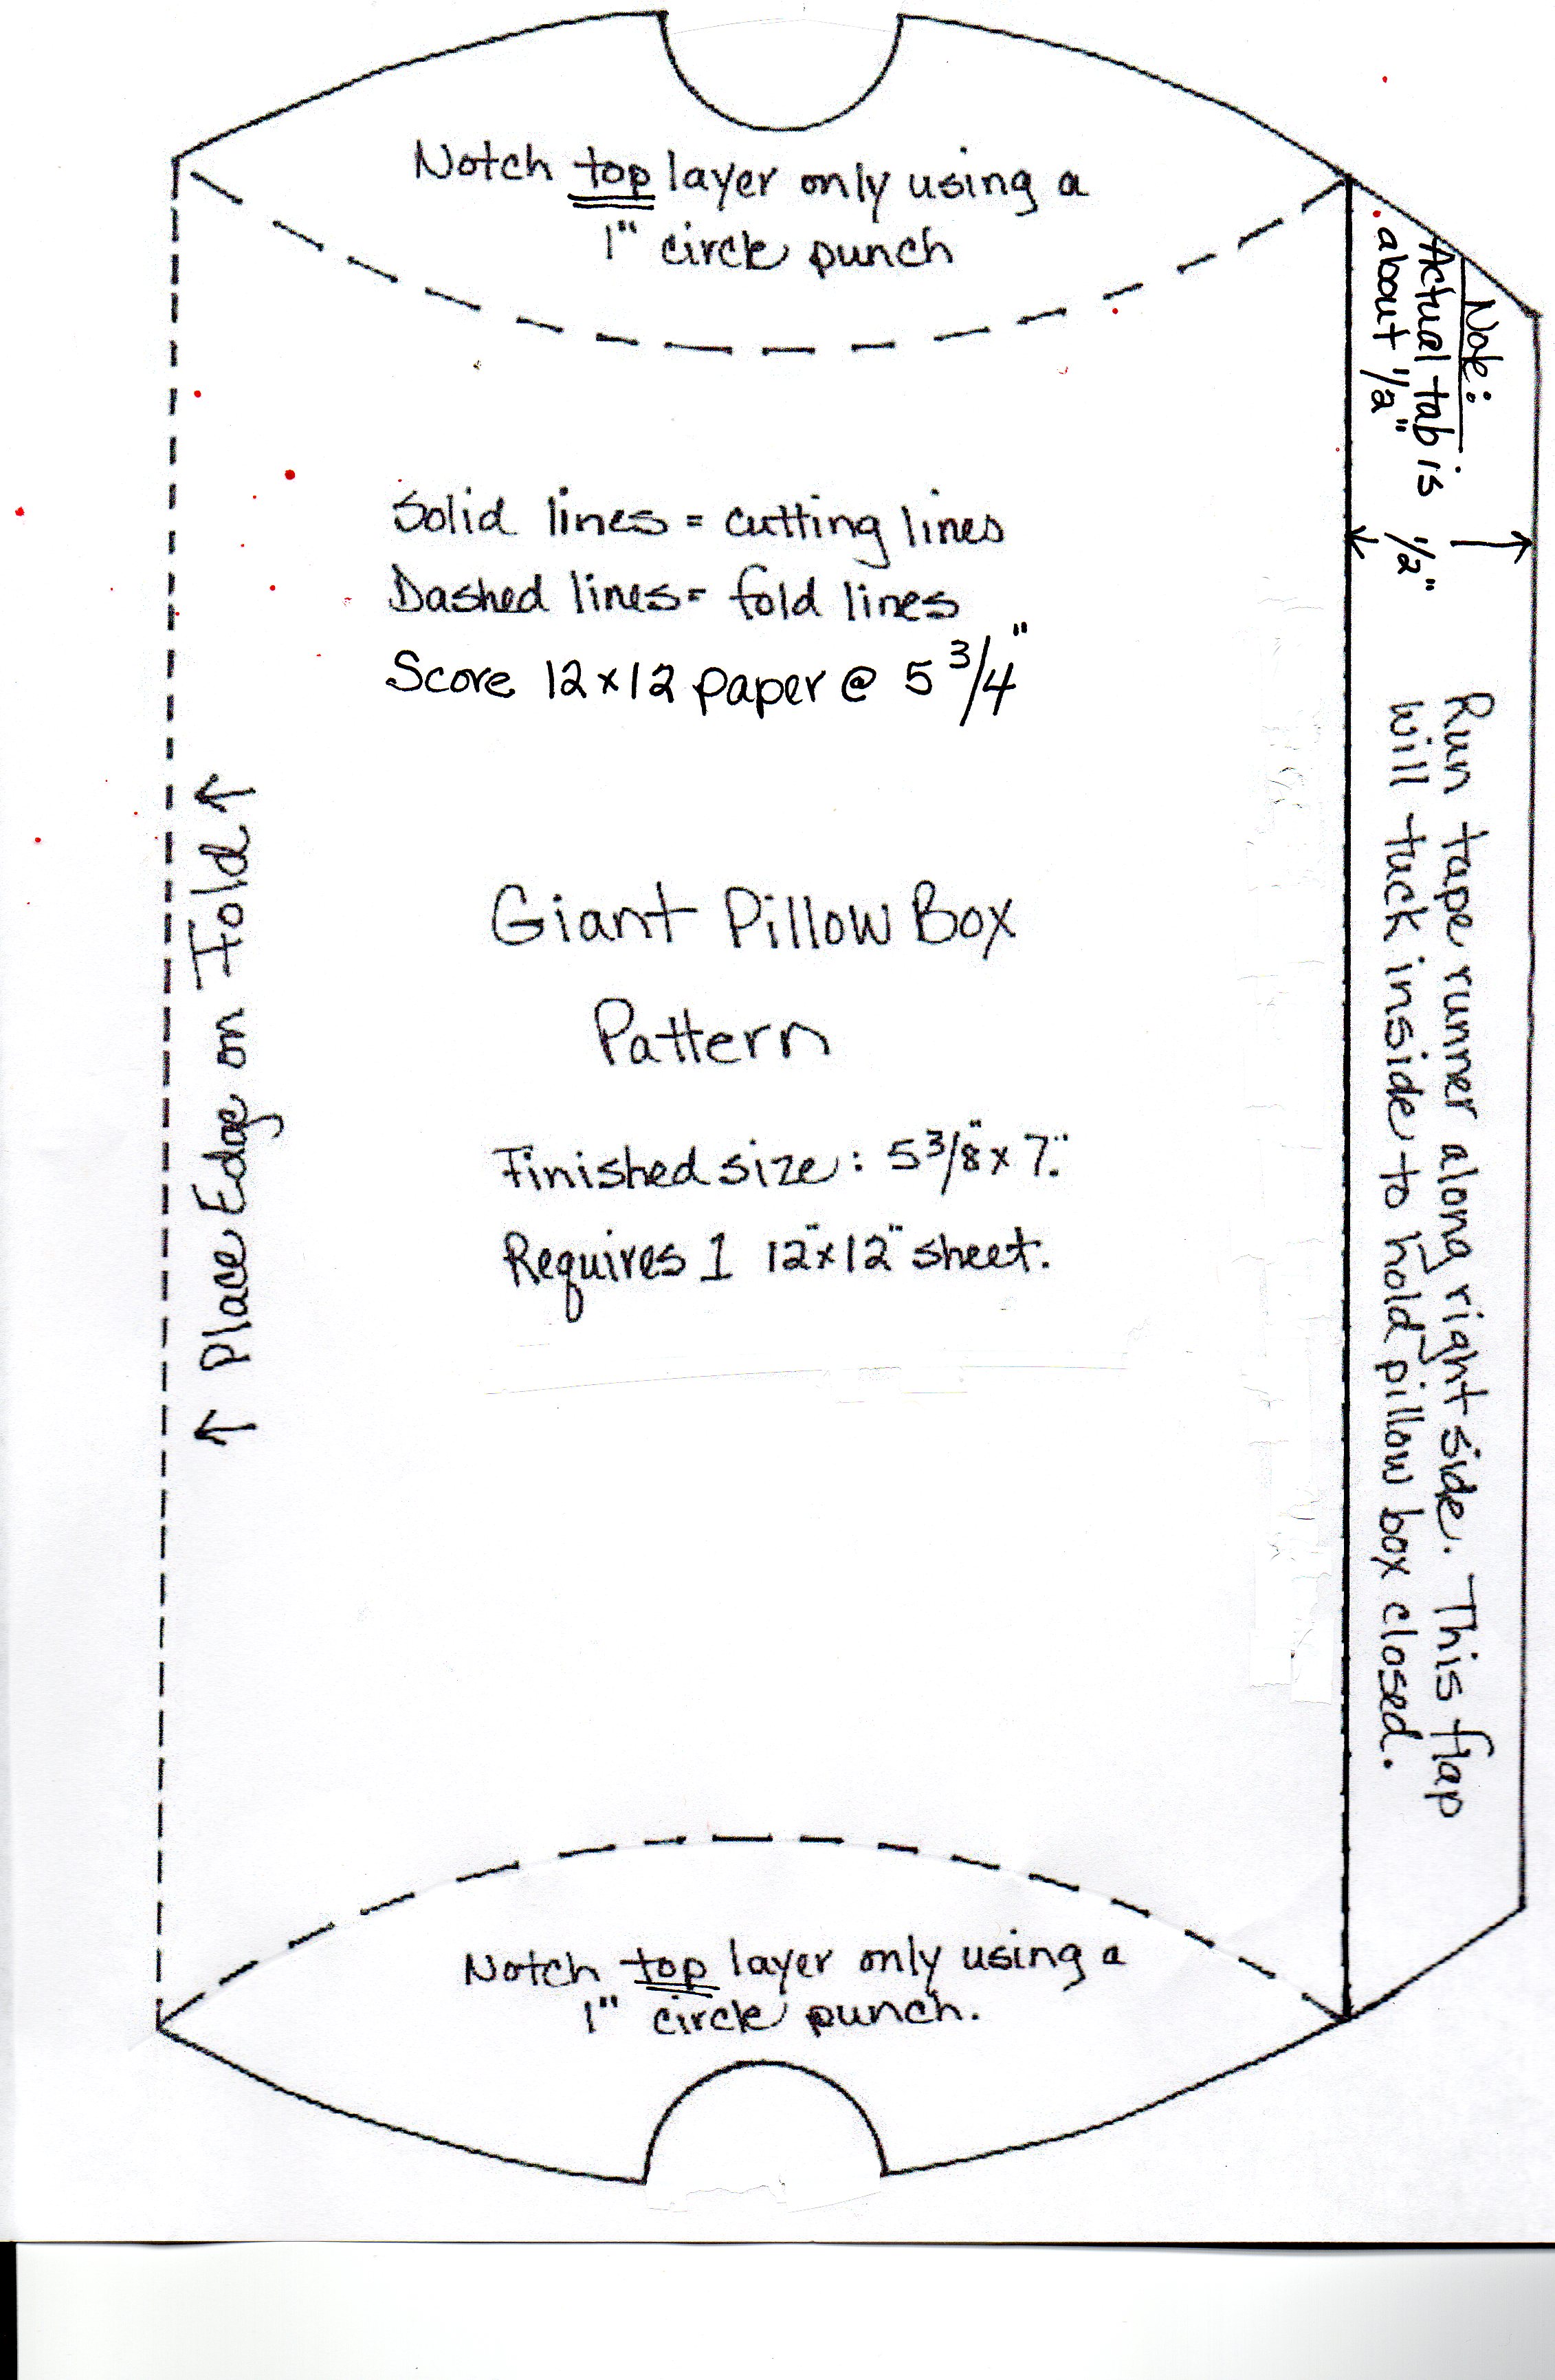
Picture
DIRECTIONS:

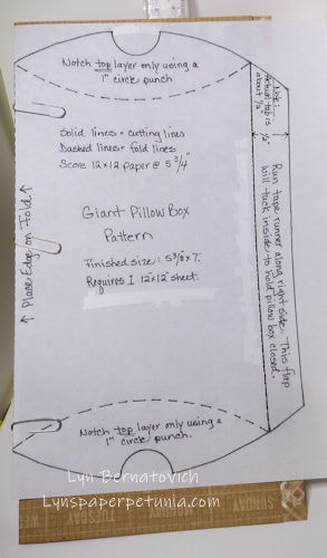
​To make the pillow box use one 12"x12" cardstock that is scored and folded at 5-3/4".

​TIP:  ​Cut the pattern and cardstock at the same time!  No tracing necessary. 

Referring to the photo below, lay the pattern over the folded 12x12 paper and hold in place with paper clips along the fold lines.  Note the two folded halves of the cardstock layers are 5-3/4 and 6-1/4.  They measure exactly and no further cutting is needed along the right long side edge.  You are cutting the curved ends and scoring where indicated.  Also score along the long right side edge to form the tab.
Picture

Thanks for stopping by!

XOXO

LYN

​
Printable Pattern:
giant_pillow_box_pattern.jpg
File Size: 1004 kb
File Type: jpg
Download File

0 Comments

COLLAGE RULES FOR CARD MAKERS

7/24/2020

0 Comments

 
I have had these notes for years and years and have lost them and found them numerous times!  There's a lot of information and now and then, it's useful to go back and read all the rules.  My favorite subsection is Image Layout, but there's a little something useful in each category.

As I design cards for the E-News, I'll be referring to these notes in hopes of helping with your card designs.

​The card below took me a long time to collage, so don't be in a hurry if you have lots of pieces!  This card has it all...large and small elements, texture, glitter, pearl paint, etc.  There are actually 8 diecuts on this card front which drove me crazy!  I took off the sentiment, but felt I liked it on.  To make the pieces an uneven number, I ended up adding 3 gems on the leaves.  Now that's better!
Picture
DEFINITION OF COLLAGE
By Lyn Bernatovich/Lynspaperpetunia.com
​

A process of combining found, prepared or printed papers, fabrics, pigments and natural objects onto a background.  Color, composition and texture all have vital roles in collage.
 
MATERIALS
 
Ephemera:  Magazines, sketches, paintings, junk mail, catalogues, newspapers, ticket stubs, receipts, photos, flyers, brochures, exotic and handmade papers.
 
BACKGROUND ELEMENTS
 
Eye catching paper needs only a few images.  Plain paper can be mostly covered up.
 
A CENTRAL FOCAL IMAGE
 
A central image pulls you into the composition.  The focus of your collage is a centerpiece image larger than the rest.  It grabs your eye.  Can be a magazine cutting, stamped image, a large bit of colored paper, a sticker or a photo.
 
RELATED IMAGES
 
Related images or supporting fare adds a visual mix.  Use smaller and less dominant pieces to work in harmony with main image.  Could be coordinating color, shape, or theme.  Do not jumble too many images into chaos.
 
IMAGE LAYOUT
 
Triangular
 
Cascade – Big to little or little to big.  Horizontally, vertically, or diagonally.
 
Focal on Left – Smaller grouped on right.  Remove or add one or move around till you like it.
 
Tilting – Adds interest.
 
Cropping background may be necessary after you’ve positioned elements.
 
ADDITIONAL IMAGES
 
Is one area too bare?
 
Does one color overwhelm others and needs an opposite?
 
Is the visual flow from one image to next too abrupt?

RULE OF THIRDS
​
Use the ‘rule of thirds’. This is a technique by which you divide your paper into three rows and three columns. The points at which the vertical and horizontal lines meet, are where the focal points of your collage should be.  TIP:   Make a template from acetate and a Sharpie and lay it over the card front to aid in layout of elements.
Picture
TAKE A PHONE PHOTO BEFORE AFFIXING ELEMENTS
 
It can be confusing after all the pieces of your well-placed collage are dumped in a pile before gluing them down!

I'd love to see your card creations using Collage Rules!


​XOXO

LYN
0 Comments

Reverse Easel Card - Horizontal Orientation

7/15/2017

0 Comments

 
Back in May, 2013, I made a YouTube video about creating a reverse easel card and I thought I'd put it on my blog as part of my tutorials.  I make this style of card A LOT because they're easy to construct and display well without tipping over.  I probably make more reverse easel photo cards because they are always customized just for the recipient.  I'd guess I've made more guy photo reverse easel cards over the years because, as in the photo below, once you capture the guy's passion, the rest is easy!

Here's a card I made for my brother's birthday last month.  He loves his Volvo and I knew he'd get a kick out of receiving this card.  I did insert directions about assembling the easel to make sure it got displayed as it was intended.  A special thanks to his wife who sent me photos to work with!
Picture
Once you have chosen a photo for your card, the rest is easy to complete!  For the link, click on the Volvo card for my YouTube tutorial.

Thanks for stopping by!

xoxo,


LYN
0 Comments

2017 Easel Calendar - March

2/17/2017

0 Comments

 
Okay, I can't help make the March calendar around St. Patrick's Day even though I have never sent a St. Patrick's Day card.  There's just something about March being all green, with lucky shamrocks, gold nuggets, gnomes and leprechauns!!!
Picture
So grab your coordinating pattern papers (whatever the company) and put together this fun March calendar project.  Use your dies (A Muse), stamps (A Muse), papers (Simple Stories) and quickly create your special March 2017 calendar! 

Thanks for stopping by!

xoxo,

LYN
0 Comments

2017 Easel Calendar - February

2/17/2017

0 Comments

 
My easel calendar is turning out to be a monthly design, so here's February using all Fun Stampers Journey products.  I did post this on my blog that you can link HERE for more details.
Picture
So this isn't a full blown tutorial, but you can refer to January's post for the actual tutorial HERE.

Enjoy!!!!

xoxo,

LYN
0 Comments

2017 Easel Calendar - January

12/30/2016

0 Comments

 
Picture
The annual calendar project continues for 2017!  This year's calendar was meant to be re-designed quarterly, but I'm unable to resist designing something for February as I love, love hearts!!!

Now that you have the basic instructions to complete this project, it will be easy to remove the sticky note holder box from the easel in order to create the next month.  Sliding a different panel into the easel is a snap .  The calendar will remain in place all year!

ENJOY!

xoxo

LYN
2017_easel_calendar.pdf
File Size: 360 kb
File Type: pdf
Download File

0 Comments

Partial Stamping Watercolor Pencil Tag

11/2/2016

0 Comments

 
Picture


It's time to think holidays and tags always are at the top of our list, right?  Here's a pretty tag idea using partial stamping AND watercolor pencils!  If you haven't used watercolor pencils in awhile, grab them and see how easy they are for adding beautiful color.  Simply click on the file below for the tutorial.

Enjoy!

xoxo
Lyn

poinsettia_watercolor_pencil_tag_tutorial.pdf
File Size: 529 kb
File Type: pdf
Download File

0 Comments

Watercolor Strip Tree Card

8/26/2016

2 Comments

 
Today I am showing you a very 'water-colory' technique using 4 Distress ink cubes, an acrylic block, a strip of watercolor paper (2-1/4 x 5-1/2 inches), an Andy Skinner Nature Set stamp, and a Misti.
Here's the finished card:
Picture
Picture
Step 1:  Lay the watercolor strip under an acrylic block.  You'll be able to see exactly what areas you will horizontally swipe the Distress inks:  Stormy Sky, Fossilized Amber, Rusty Hinge, Peeled Paint.  Take the Distress cube and firmly press in a horizontal pattern across the width of the watercolor paper.  Move to the next color and repeat the process until all 4 colors are used.  Spritz liberally with water.  I used Tim Holtz's Distress sprayer.
Picture
Step 2:  Press the acrylic block onto the watercolor strip.  The result will look approximately like the above photo.  Notice there is leftover ink left on the kraft mat.  As you are drying the strip, spritz with the Distress sprayer to add cool droplets.  Feel free to press the strip back into any leftover ink for added layers.  Continue drying and spritzing as desired.
Picture
Step 3:  Now that the watercolor panel is dry, layer the card front onto the Misti and position the watercolor strip slightly left of center.  Ink the tree stamp with Memento Rich Cocoa inkpad.
Picture
This is where the Misti comes into play!  The first stamping is somewhat weak and the image is not dark enough.  Keep in mind we're just concentrating on stamping the watercolor panel.  Ignore the gap between the watercolor strip and the card front panel.
Picture
Step 4:  Here is the second stamping.  The tree looks like the right color intensity now.
Picture
Step 5:  Remove the watercolor strip and proceed to finish stamping the tree.  This may only take one more stamping.
Picture
Step 6:  Here's how the final stamping of the tree looks.  Keep in mind we don't care how the center of tree looks since it's covered up by the watercolor strip.

​What's cool with this card is that it is gently easing us into fall and can cover any occasion since there's no sentiment on the card front.

I hope you give this technique a try!

xoxo

LYN
2 Comments

Partial Stamping Tutorial 

7/29/2016

2 Comments

 
Welcome to another card tutorial featuring A Muse Studio Stamps and supplies!  Today we're using a portion of a stamp that is typically called "partial stamping."  There's a second trick on the card that doesn't really have a catchy name, but could fall under partial stamping as well.

​Here's the finished card:
Picture
Bouquet of Love is from July's Monthly Collection.  You would never guess there's a large pitcher underneath the flowers!  Bee Happy sentiment actually has a smaller bee in front of Happy that is part of the stamp.  I liked the larger bee and mounted it right over t​he smaller bee!

​Here is a photo of supplies you'll need to get started:
Picture
Cut a card base 5-1/2 x 8-1/2 and score at 4-1/4
Cut a Bubblegum panel 5-1/2 x 4-1/4 an affix to card front
Cut watercolor paper (or Sugar cardstock) 3 x 5-1/4
Diecut the Medium Scallop Border Die onto a scrap of Slate Dot cardstock 1 x 5-1/4
The Bubblegum stitched ribbon in the photo was not used.  Instead, I used Bubblegum Satin Ribbon cut at approximately 25".  Of course, you could save ribbon and tape it just over each edge rather than wrap around.
Assorted Tombows
​Versafine Onyx Black Inkpad
Quickie Glue Pen
Waterbrush
Scor-Tape or similar (I used 1/8")
​Tape Runner
Picture
1.  Ink the flowers with Versafine Onyx Black (avoid inking the vase).
Picture
2.  Stamp the first image as shown.
​
Picture
3.  Stamp the second image over to the left and slightly lower than the first stamped image.
4.  Stamp the sentiment as shown.
5.  Stamp the larger bee on a scrap of cardstock.  Refer to the finished card for coloring.  Fussy cut out if you don't have the matching die.  Apply Quickie Glue Pen to the wings and Diamond Glitter.  Mount onto card with foam tape to add dimension once the card is completely assembled.
6.  Refer to finished card for coloring reference.  I scribbled Tombows onto an acrylic block and picked up color with a waterbrush.  No need to be too fussy here, especially if you're using Sugar cardstock as you don't want the paper to become too wet.
​7.  Once the flowers are dry, add a wash of blue to the background.
Picture
8.  Lay a length of Scor-Tape along the long edge of the flower panel.  Lay the scallop in the approximate area it will be on the card.  Remove the Scor-Tape release layer and line up the panel over the scallop border being careful to get it on straight.

9.  Wrap ribbon around the scallop/floral panel and tie in a bow.  Affix to the Bubblegum card front.
​
10.  Mount the large bee in place with foam mounting tape.

Now it's your turn!  I think it would be fun to create this same card in yellow, orange, blue, red, or purple.  I can't wait to make more of these in other colors!

​xoxo,

LYN
2 Comments

Man's Tux Card Tutorial

5/21/2016

0 Comments

 
Picture
Since Father's Day and weddings are just around the corner, I thought you'd enjoy this card tutorial from a bunch of years ago!  This was created for Paper Craft Planet's 3D Tuesday group back in June, 2012!!!

If you click on the photo, you'll be taken to the PDF instructions.

Enjoy!


LYN
0 Comments
<<Previous

    Archives

    July 2017
    February 2017
    December 2016
    November 2016
    August 2016
    July 2016
    May 2016
    March 2016
    February 2016
    January 2016
    December 2015

    Categories

    All
    #amuse Studio
    #dreamweaver Stencils
    #Lyn Bernatovich
    #partial Stamping
    #stampendous
    #watercolor

    RSS Feed

Proudly powered by Weebly