
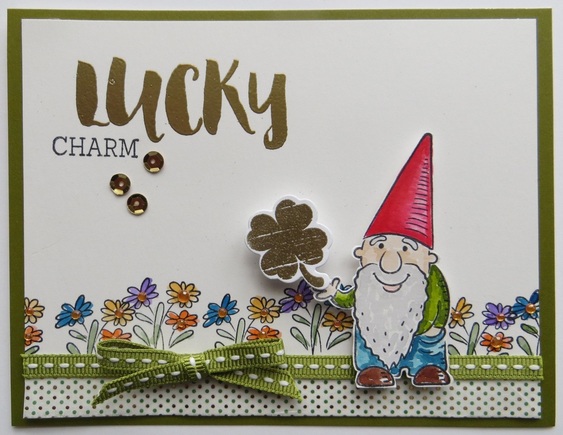
Featuring A Muse Studio February Monthly Collections: Lucky Charm and Gnome Other
A Muse Studio Supplies:
SSSE034 – Lucky Charm
TAD0235 – Lucky Charm Die
SSSE032 – Gnome Other
PAPS504 – Fern Cardstock
PBRST20 – Bristol Watercolor Cardstock
EAEP003 – Embossing Powder-Gold
TWBSM09– Water Brush Pen
ISOP031 - Staz-on Jet Black Inkpad
RAST504 – Fern ¼” Stitched Ribbon
ESWT011 – Washi Tape Lucky Collection
EATW301 – Orange Twinkle Stickers
Gold Sequins From Christmas Assortment
IVMP001 - Versamark Ink
ATTR001 - Tombow Adhesive Tape Runner
ATMMT02 – Tombow Mono Adhesive
ATGDMIN – Mini Glue Dots
Tombow Markers:
942, 925, 856, 899, 993, 526, 555, 636, 847, 177, N55, 126,800
Instructions:
Step One: Stamp gnome onto a scrap of Bristol Watercolor paper with Staz-on jet black. Scribble Tombows in two different reds, two greens and two blues onto an acrylic block that is resting on white paper in order to see each color. Starting with the lightest color, paint each section of the gnome using a little bit of water on the brush. Once an area is fairly dry, go back over with a darker Tombow to add shading. Do the hat, shirt and pants, then go to the beard, shoes and skin areas. When dry, fussy cut leaving a little white border. Set aside.
Step Two: Cut Bristol Watercolor paper 5 ¼ x 4 inches. Draw a light pencil line one inch from the bottom to help align the bunches of flowers. Stagger to create different heights of the flowers. Without too much fuss, quickly watercolor the flowers with Tombows scribbled on an acrylic block. Do not try to be perfect with this step!
Step Three: When dry, lay dotted washi tape along the bottom edge of the card panel. Lay a 1/8” length of Scor-tape or similar along the top edge of the washi tape. Affix a 5-1/4 length of stitched ribbon securely over the tape and burnish firmly to adhere the ribbon.
Step Four: Heat emboss the word ‘lucky’ with Versamark ink and gold embossing powder onto the watercolor panel. Stamp ‘charm’ adjacent to ‘lucky’ with Staz-on jet black. Cut fern cardstock 5-1/2 x 8-1/2 and score at 4-1/4. Affix ‘lucky’ card panel to the card front.
Step Five: Affix 3 gold sequins near the word ‘charm.’ Affix orange Twinkle Stickers to the flower centers using all 3 sizes of Twinkles. Hand tie a small bow and affix to the strip of ribbon with Glue Dots.
Step Six: Stamp the clover with Versamark ink on a scrap piece of cardstock and heat emboss with gold embossing powder. Die cut the clover. Mount the gnome with mounting tape to the card front to the right of the bow and slightly over the stitched ribbon. Mount the clover with a double layer of foam mounting tape to the gnome’s hand.
Enjoy!
LYN
 RSS Feed