
I love Splash! and never tire of working with it. This month's swap was to use Splash! in any way we desired. Woo hoo for me! Here's my card:
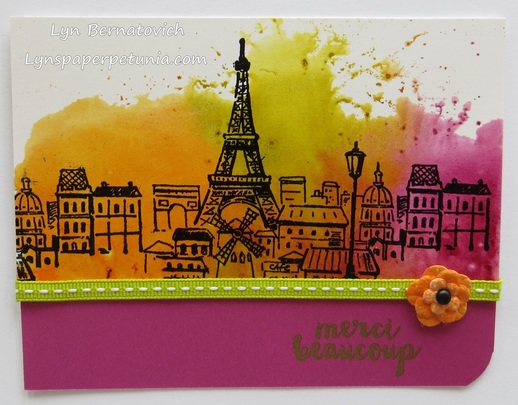
The card began b spritzing Hibiscus, Wasabi and Orange
Splash! adjacent to each other on a craft mat. A generous spritz of Iridescent Splash! was next. A 5-1/2 x 4-1/4 watercolor paper was laid over the puddle, gently pressed with my fingers and peeled off. I purposely placed the panel so not all of it would be colored in Splash! It was set aside to dry. I made about 10 panels this way adding additional spritz's of Splash! to the craft mat.
Next, the c'est la vie stamp was inked with VersaMark and stamped onto the bottom edge of the Splash! panel. The stamp was re-inked again and re-stamped to the left of the Eiffel Tower to fill in the width of the card. A Muse Detail Black embossing powder was sprinkled over the inked area and heat set.
Meanwhile, I inked merci beaucoup with Versafine and stamped a Hibiscus card front panel in the lower right corner, sprinkled detail gold embossing powder and heat set.
The c'est la vie image was cut down to approximately 3-1/4" tall. Depending where the sentiment was stamped, trim as needed. A 1/8" strip of Scor-Tape was laid along the bottom edge of the embossed image and a length of stitched grosgrain was affixed over the tape with the ends of the ribbon wrapped behind the panel. The panel was affixed to the Hibiscus card front.
A Muse Meadow Mix flowers were laid on a craft mat and spritzed with orange Splash! Some were thoroughly saturated and some were not. Once dry a small brad held the 3 different sizes of flowers together. Beacon Fabri-Tac was used to affix the flower to the ribbon.
Hope you found some inspiration in my A Muse Studio card design today and want to play with your Splash! sprays!
LYN


 RSS Feed