Lyn's Paper Petunia
  • Home
  • CHALLENGES/COLOR INSPIRATION
  • E-NEWS
  • STAMPENDOUS
  • TEMPLATES/TUTORIALS
  • WATERCOLOR
  • About
  • Contact
  • Untitled

Stampendous/Dreamweaver - Week 1

5/6/2015

9 Comments

 
The theme this week at Stampendous is PATRIOTIC and the first color pallet we think of is red, white and blue, of course!  As I was thinking about how I would create a Dreamweaver card using this theme, I had an idea that started something like, "hmmmm, I wonder if this would work."  Basically, I was flying blind, but I took a few work-in-progress photos anyway just in case my idea worked.  I usually don't take progress photos when I'm creating something totally new to me, as I think it's bad mojo, but I wanted you to see the process in case things did work for this card.  

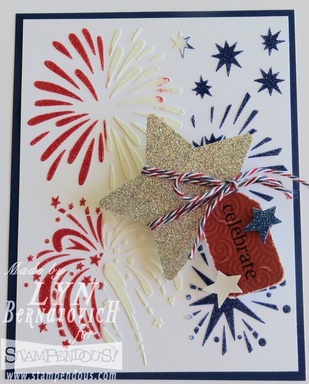
I'm happy to say that this technique worked and here is my card for today:
Picture
Picture
Here's the pasted stencil before I removed it from Neenah Solar White cardstock.  Amazingly, I only had to pull the paste once, which is how I got such clean color divisions.
Picture
Fireworks (Lj886)
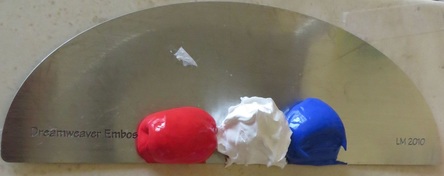
To achieve a crisp red, white and blue pasted image without smudging (that's another technique), I lined up the Dreamweaver Glossy Red, Glossy White and Glossy Blue pastes evenly along the edge of the Paste Spreader (LM2010) using the Pallet Knife (1385).  Wish you could see this in person as it is colorful, bright and sparkly.
Notice the pastes are barely touching.  In hindsight, this was way too much paste, so rather than toss it or throw it in a 'sludge pot,' I kept pasting other stencils until I used it all.  Stay tuned for those results!
While the paste was still wet, I sprinkled crystal ultra fine glitter from my stash.  The stars were punched with Marvey punches from glitter paper (craft store) and the tag was punch with a McGill punch and a scrap of red cardstock from my stash.  It was stamped with the Stampendous Perfectly Clear Stamps Birthday Assortment (SSC1115) set.  I dry embossed the tag using the Dreamweaver Swirls Stencil (LJ863) to give it some texture.  

Here's a cool design tip:  When there is a busy background as on this card, ignore it when adding embellishments.  The background can interfere with our desire to add dimensional pieces, so pretend the background is plain.  It's a neat trick that I teach and it takes the stress out of to add or not to add embellishments.   The silver star is mounted with an Action Wobble Spring.

Here is the Design Team list for today.  I'd love your comment before you go!

Stampendous
Lyn Bernatovich (That's me!)
Louise Healy
Alison Heikkila
Pam Hornschu
Laura Drahozal
9 Comments

Dreamweaver Stencils - Showers to Showers

4/8/2015

6 Comments

 
This card is packed with numerous stencils (7 to be exact)!  It actually began with the Rain Stencil (LJ905) that screams April showers to me.  

Step 1:  Raindrops - To quickly color the Rain Stencil I used the Letterpress Technique.  I laid a piece of Neenah Solar White into my paint box and lightly spritzed the Rain Stencil with Memory Mist Blue Lagoon (MM20) and then Memory Mist Iridescent (MM28) to soften the color.  I carefully picked up the stencil by the edges and laid it onto my Sizzix Big Kick platform, next white cardstock, the Rubber Mat and 2 embossing platforms.  The result is a lovely raised white raindrop.  To give the raindrops some shine, I laid the cleaned stencil over the embossed cardstock and pasted Transclucent Paste (DEPT) over the stencil and allowed it to dry.

Step 2:  Owl - The Owl Stencil (LL3039) was designed next.  I pasted it onto Neenah Solar White again with Black Matte Embossing Paste and while that was drying, I diecut the Nesting Owls (DG751) out of scraps of Core'dinations and Authentique papers.  To affix the little diecut paper pieces onto the pasted owl, I 'painted' Tombow Mono Glue onto specific areas of the pasted owl and then pressed the paper down.  Another method is to glue the paper pieces first and affix to the pasted owl.  Either way works.  Once all the pieces were in place and dry, I fussy cut the embossed owl and set it aside.

Step 3:  Umbrella - I laid the stencil onto Authentique pattern paper and traced it with a pencil and fussy cut it out.  Scored lines were created on the reverse side of the paper.  Antique Linen Distress Ink was used on the edges to give it some definition.

Step 4:  Branch & Leaves - To anchor the owl and make it look as if it was perched on a branch, I used parts of the Stylized Dahlia diecut (DG743).  The swirl was painted with watercolor paint.  Some of the leaves were dry embossed with the Mosaic Swirls Stencil (LJ901) and then painted with watercolor.  The rest of the leaves were diecut from Core'dination paper.

Step 5:  Sentiment - Two stencils were used to create the sentiment with Splendor ink and a 1/8" stencil brush onto Neenah Solar White:  Four Seasons (LJ875) and Rain Words (LG738).  The top was hand torn for a hilly effect.

Step 6:  Card Assembly - The sentiment piece was affixed first, then the owl placed, the umbrella was angled and mounted with foam tape and finally, some of the leaves were inserted with foam tape and some were glued flat.

For a shower of inspiration, please visit the blogs of the "B" team:
 
Dream It Up!

Louise Healy
Alison Heikkila
Kristine Reynolds
Pam Hornschu
Gill Wilson
Cindy Groh
Lyn Bernatovich (that's me!)


An InLinkz Link-up
Ever use the expression, "When it rains, it pours"? This does not have to be a bad thing, does it? For the month of April, the Dream Team are featuring "Showers of Showers" as our theme. As usual, we'd love for you to play along. Just link your creation on the Dream It Up! blog for a chance to win the stencil of your choice...bonus chances for incorporating Dreamweaver and/or Stampendous in your design.

Here's my interpretation of April's theme:
Picture
6 Comments

Dreamweaver/Stampendous/Woodware Blog Hop - Day 1

3/22/2015

31 Comments

 
This week we’re going to celebrate with the awesome Woodware Design Team and the Dreamweaver Stencils Dream Team all of the the great Stampendous and Dreamweaver Stencils products that Woodware makes available to the UK market. This is good news for our crafty friends in the UK because we’ll be offering prizes and our UK friends are eligible to win!! We’ll be offering three prizes in the UK and three in the US. Each prize package will consist of Nathalie Kalbach’s terrific Grunge Mixed Media Cling Rubber Stamp Sets and the beautiful Zen Butterfly Dreamweaver Stencil! Both products are ideal for adding texture and backgrounds to your projects!

Deadline to comment is Sunday, March 29th, Pacific Time. Winners will be picked using random.org and announced Tuesday, March 31st, in the afternoon.

And that’s our theme!! Making Texture. We hope you’ll enjoy the wonderful inspiration that three talented teams will bring you this week! Be sure to visit all the blog links listed and leave your comments! Each comment will count as an entry towards one of the terrific prize packages.

Here's my project for today:
Picture
I love having an idea in my head work the first time!  I grabbed some previously colored papers from my stash and cut out a 4x7 tag.  The background was literally sprayed with Memory Mists onto a craft sheet and watercolor paper smooshed into the puddles of color.  I embossed Stampendous Beautiful Life stamp onto the tag with gold embossing powder from my stash.  To add more texture, I poured embossing enamel (Aged Rose and Shabby Pink), Rose Color Fragments and Pearlized Mica all from the Encrusted Jewel kit, and heated everything from underneath the tag.  The Bare Tree die (LOVE) was diecut from previously colored scraps and cut apart and mounted onto the tag.  The branches were bent to create more dimension

I am SO in love with the Fairy Stencil (LG762) and couldn't wait to use her again!  Her wings were stenciled with Splendor gold ink using the Swirls Stencil (LJ863) and then edged with Stampendous Champagne Glass Glitter from the Encrusted Jewel Kit/Pink.  I cut into her wings to create more dimension.  The rest of her was colored with Artist's Paintstiks and stencil brushes.  I did use my Picasso tool for the more intricate areas.

Since Easter is around the corner and bunnies are always a sure sign of spring, I embossed the Bunnies Stencil (LL583) with glossy black paste onto glitter Core'dinations paper and then cut out just one of the 5 bunnies. A tiny cotton ball was affixed to his tail.  Foam tape gives the bunny nice dimension.  Tiny flowers from my stash were affixed into the fairy's hand and tiny pearls were added as a wreath on her head.  I scored some lace from a local flea market and combined it with May Arts satin ribbon.

Hope you enjoyed my post today but before you hop to the next designer's post, I'd love to hear from you!
Stampendous Blog
Janelle Stollfus
Pam Hornschu
Kristine Reynolds

Woodware Craft Collection Blog
Dorothy Adam
Francoise Read

Dreamweaver Stencils Blog
Lyn Bernatovich (that's me!)
Cindy Groh
Gill Wilson
Alison Heikkila
31 Comments

Dreamweaver is Marching into Spring!

3/13/2015

2 Comments

 
Ready for fresh air, sunshine, new leaves, and flowers blooming? Well, the Dream Team is right there with you! Our challenge for the month of March is...coincidentally...Marching into Spring. Per usual, we'd love to have you play along with us, and link your own creations to the Inlinkz tool on the Dream It Up! blog, or at the bottom of this post. Play as many times as you'd like. Those of you who work Dreamweaver and/or Stampendous products into your projects receive bonus points, but everyone has an opportunity to be the winner who receives the stencil of their choice.

Here's my hint of Spring and I also want to thank Pam for posting my card on the Dreamweaver blog while my blog was having technical difficulties.
Picture
I can't stop playing with Stampendous' Minuet Bird stamp and Dreamweaver's Swirly Dots  (LX7029) stencil!   This was actually something I had worked on abit ago and set aside.  I'm sooooo glad I didn't toss it.  

The design began by spraying Memory Mist through the swirly dots stencil directly onto watercolor paper.  Once dry, I added the blob/drippage of more Memory Mist.  

The bird image was stamped with Versafine onyx black ink and then layered using Core'dinations papers. I painted the bird with acrylic paints from my stash.  The fern was diecut from my Dreamweaver drawer of scrap papers.  The 'nest' is actually a layered flower I made from May Arts mesh.  It's held together with a brad.  I stiffened it by wiping Mod Podg all over to give it some shape.  Once dry, I sprayed it Memory Mist to add color.  The bird eggs were torn away from a Prima nest from my stash.

Stampendous glass glitter was added to the lower right corner.  Seam binding was tied in a double bow and a tiny spring tag from Dreamweaver's Four Seasons (LJ875) stencil was colored with Splendor ink and a 1/8 inch stencil brush.

The "B" team would love to share their interpretations of this theme:

Dream It Up!

Lyn Bernatovich (that's me!)
Louise Healy
Alison Heikkila
Kristine Reynolds
Pam Hornschu
Gill Wilson
Cindy Groh


An InLinkz Link-up
2 Comments
Forward>>
    Picture

    So glad you're here!

    Subscribe to our mailing list

    * indicates required
    Email Format
    Picture
    Click on above card for CHALLENGE SITE LINKS
    Picture
    Picture
    The Color Throwdown
    Picture
    #TGIF222 - Let's Shake it Up!
    Picture
    Picture
    Picture
    Picture
    Picture
    Picture
    Picture
    Picture
    Picture
    Picture
    Picture
    Picture
    Picture
    Picture
    Picture
    Picture
    Picture
    Let's Have S'More Challenge Winner #81
    Picture
    Muse: Christmas Visions Challenge #109
    Picture
    Muse Challenge #276, #277, #282, #287
    PictureChallenge #85 - Rustic Blooms!

    Picture
    Challenge #70 - Purple Haze Fluid Watercolor Butterfly!
    Picture
    Challenge #69 Rich Texture
    Picture
    Picture
    PictureI am a certified Dreamweaver Instructor

    Archives

    March 2020
    February 2020
    January 2020
    November 2019
    October 2019
    September 2019
    August 2019
    July 2019
    June 2019
    May 2019
    January 2019
    October 2018
    September 2018
    August 2018
    July 2018
    May 2018
    March 2018
    February 2018
    January 2018
    November 2017
    October 2017
    September 2017
    July 2017
    June 2017
    May 2017
    April 2017
    March 2017
    February 2017
    January 2017
    December 2016
    November 2016
    October 2016
    September 2016
    August 2016
    July 2016
    June 2016
    April 2016
    February 2016
    January 2016
    November 2015
    October 2015
    September 2015
    August 2015
    July 2015
    June 2015
    May 2015
    April 2015
    March 2015
    February 2015

    Categories

    All
    #alwaysfunchallenges
    #A Muse Studio
    #andy Skinner
    #CASonFriday162
    #Creatime
    #doodle
    #DreamweaverStencils
    Dreamweaver Stencils
    #DWStencils
    Faber Castell
    Faber-Castell
    #Fall
    #FMS389
    #freshly Made Sketches
    Fun Stampers Journey
    #Geli Arts
    HSSSC#317
    #Koi Watercolor Paints
    #May Arts
    #Mixed Media
    #penny Black
    #sketched Cards
    #somethingnew
    #spellbinders
    Stampendous
    #Stampendous
    #stb171
    #The Card Concept
    #THEMAILEROOM
    #timholtz
    #Tombow
    #watercolor
    #Zig Clean Color Real Brush

    RSS Feed

Proudly powered by Weebly